Transferring My N64 Saves
Kyle Niewiada on April 11, 2015
10 Minute Read | Large project
Updated on October 01, 2021
When I was younger, I would spend weekends after school playing through The Legend of Zelda: Ocarina of Time. After a while, I beat it. I remember the fun I had navigating through puzzles and chasing down heart containers. I loved every minute of it.
If you are here looking for information on how to dump your N64 Ocarina of Time save files, check out my new guide for it. If you’d like to learn how to transfer other save files and how I originally dumped my Ocarina of Time save, read on.
About a year ago, I discovered that my Ocarina of Time cartridge was on borrowed time. It turned out that this was one of a handful of cartridges in the Nintendo 64 library that uses a battery to maintain its save file. According to the trustworthy Internet, these batteries have a lifespan between 15 and 20 years. So I did what any other dreamy eyed gamer would do. I got out my N64 and started tinkering with it.
I created a project with one goal in mind. To transfer all game saves from my minuscule N64 library into a digital format that I could use on other devices. I had four games that I needed to get saves off of.
- The Legend of Zelda: Ocarina of Time
- Star Wars Episode One: Racer
- Mario Party 3
- Super Mario 64
Here is how I did it.
EEPROM Saves (Star Wars, Mario Party, and Super Mario):
- Dump ROM
- Transfer save to memory pack using GameShark
- Transfer memory pack data to computer using DexDrive
- Graft a new save file from DexDrive save with a hex editor
- Load in Project64 and play
Ocarina of Time Save (SRAM):
- Dump ROM
- Dump contents of active RAM (with my glorious Pentium III)
-
Recalculate save checksum -
Graft a new save file from dumped data with a hex editor - Although this blog post follows the above, an easier method for converting the RAM dumps has been created by Bkacjios
- Load in Project64 and play
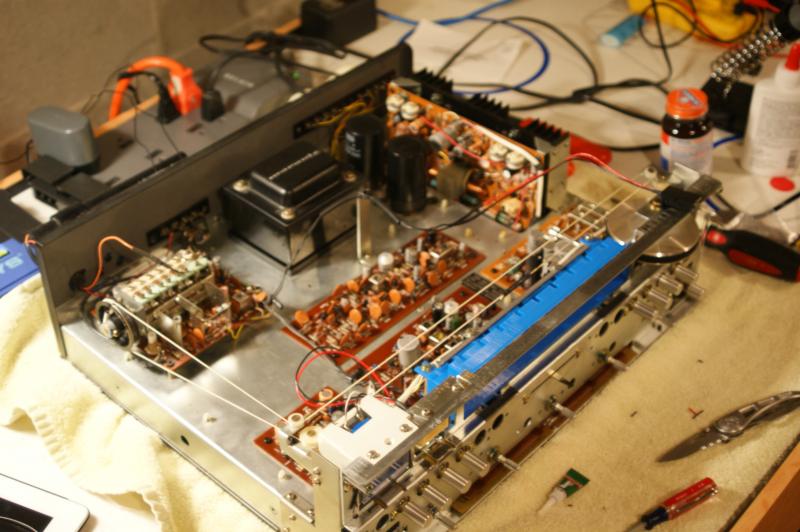
 The N64 transfer setup
Dumping My ROM
Star Wars, Mario Party, and Super Mario 64 use EEPROM to store their game save. This made my project easy. I followed a known method by using a DexDrive. The first thing that I did was dump each game using the GameShark’s parallel port with the open source software N64RD using the command below. (Others have tried using GameShark’s software, but it has been problematic. Using N64RD seems to be the way to go). This program allowed me to back up each of my games for later use in my project. It also allowed me to dump my ram, but that is coming later. I used kodewerx’s Hacking N64 wiki to know what addresses and offsets for the RAM and ROM space I needed.
$ ./n64rd -dgame.z64 -a 0xB0000000 -l 0x02000000
Transferring Saves
To transfer the EEPROM games, I used a GameShark (I chose v3.2) to transfer the save from my cartridge to the memory pack. Once I transferred every game over to the memory pack, I used my Nintendo 64 DexDrive (Pictured below) to move the save files onto my computer. But each save file was wrapped inside a proprietary container. When examined with a hex editor, I noticed that each file was still there and all I had to do was cut out the bytes that made up the file container. Each one of the save files was structured in a different way.
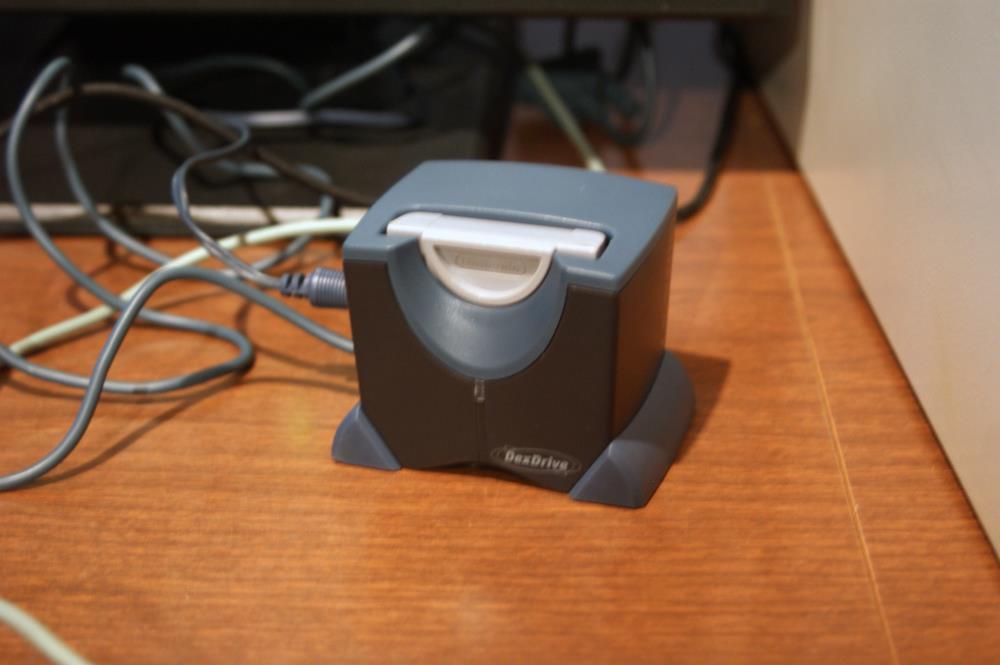 InterAct DexDrive
I took known game save copies from the internet for each of my EEPROM games and matched them up to my DexDrive save contents. I simply grafted over the matching bytes from the DexDrive save into the existing save files in my hex editor, loaded them up in my Project 64 emulator, and everything worked without a hitch. The only save that I had an issue with was Zelda Ocarina of Time. That is because I later found out that the SRAM save format was too large for the GameShark to transfer. So GameShark compressed it before copying it to the memory pack. This was useless to me unless I want to use the GameShark to transfer it back to the cartridge. Having no idea how it was compressed, I thought I was out of luck. I contacted Interact and they were unable to provide me with information on the algorithm the GameShark used.
Hitting a Wall
The first thing that I tried was dumping the SRAM by using the GameShark. However, I was unable to find any documentation on how to pull the SRAM data or if it was even accessible from the GameShark. But I did find someone on AssemblerGames who was trying to dump the contents of their SRAM into the memory pack controller by uploading it with gsuploader. According to their post, they had some luck with a few games but were unlucky with others.
I was unable to get sram2mpk.bin working with my Ocarina of Time game. I spent a whole day attempting to load the program, but every time it locked up on me and dumped no information. I was able to verify (with the help of Lawrence) that gsuploader was working correctly by loading up an older project named Neon64, an NES emulator for the N64. Below is an image of my N64 running Super Mario Bros 3 with the help of Neon64.
 Super Mario Bros 3 on the N64
This led me to conclude that sram2mpk.bin was unlikely to work for my game. I thought I had reached a dead-end. That is until I discovered spinout182’s (defunct) wiki that documented the Ocarina of Time save file.
A New Plan
The documentation on the Zelda save file wiki claimed that save files were built by copying over a certain block of memory. After reading through this, I went back to my GameShark and dumped the entire contents of its RAM (using N64RD) while in game using the command below with N64RD.
$ ./n64rd -dmemory.z64 -a 0x80000000 -l 0x00800000
After opening up the RAM dump with my hex editor, I followed up to the address 0x0011A790 (or 0x8011A790 inside my GameShark memory) and copied 0x1450 bytes (the size of the game save file).
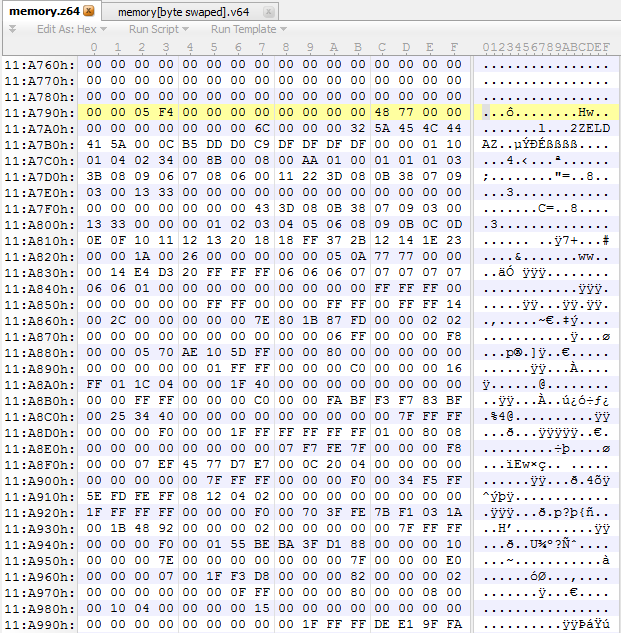 Untouched memory dump in native N64 (Big Endian)
Once I had my save file, I converted it from N64 native to something that an emulator could read (big endian -> little endian).
I used uCON64 to do just that and convert Big Endian->Little Endian (or vise versa) with this command:
ucon64 --n64 --nint --dint --swap2 save.sra
--n64         force recognition
--nint        force ROM is not in interleaved format (1234, Z64)
--dint        convert ROM to (non-)interleaved format (1234 <-> 2143)
--swap2       word-swap ROM (1234 <-> 3412)
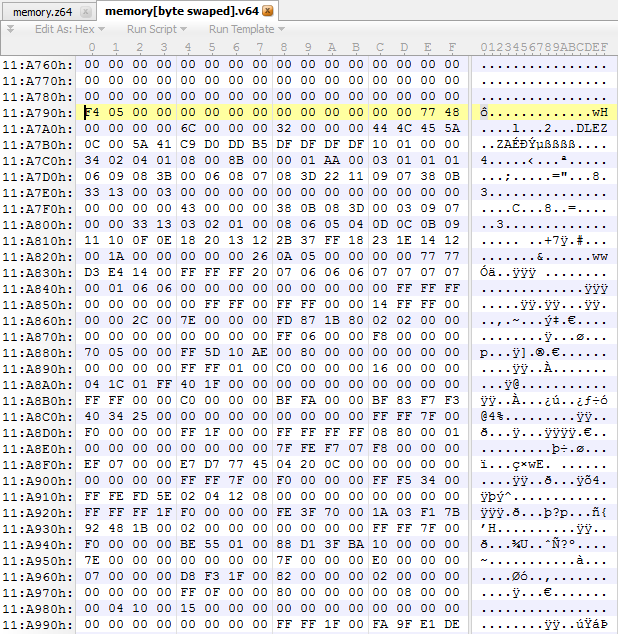 Byte swapped memory dump (Little Endian)
I tried grafting over my completed save data from RAM into an existing Ocarina of Time save file. However, when I tried to load it up, I discovered that the save file was corrupt. I took a look back at what I had done. I talked it over with Lawrence and we concluded that my save file checksum that was dumped from RAM was probably bad. After referencing the spinout182’s (defunct) wiki yet again, I tried to see if I could calculate and verify my own checksum.
Discovering the Checksum
I tried using the algorithm from the wiki, but I was unable to get it to work. So instead I decided to work it out on my own. After a lot of digging around to see how the checksum is calculated, I was able to figure out the exact algorithm used. I took an existing Ocarina of Time save file, converted it back to N64 native (little endian -> big endian), and ran it against a large list of checksum/crc algorithms with many MANY programs. I found one that matched; and it was using 010 Editor. The name: UShort (16 bit) – Big Endian.
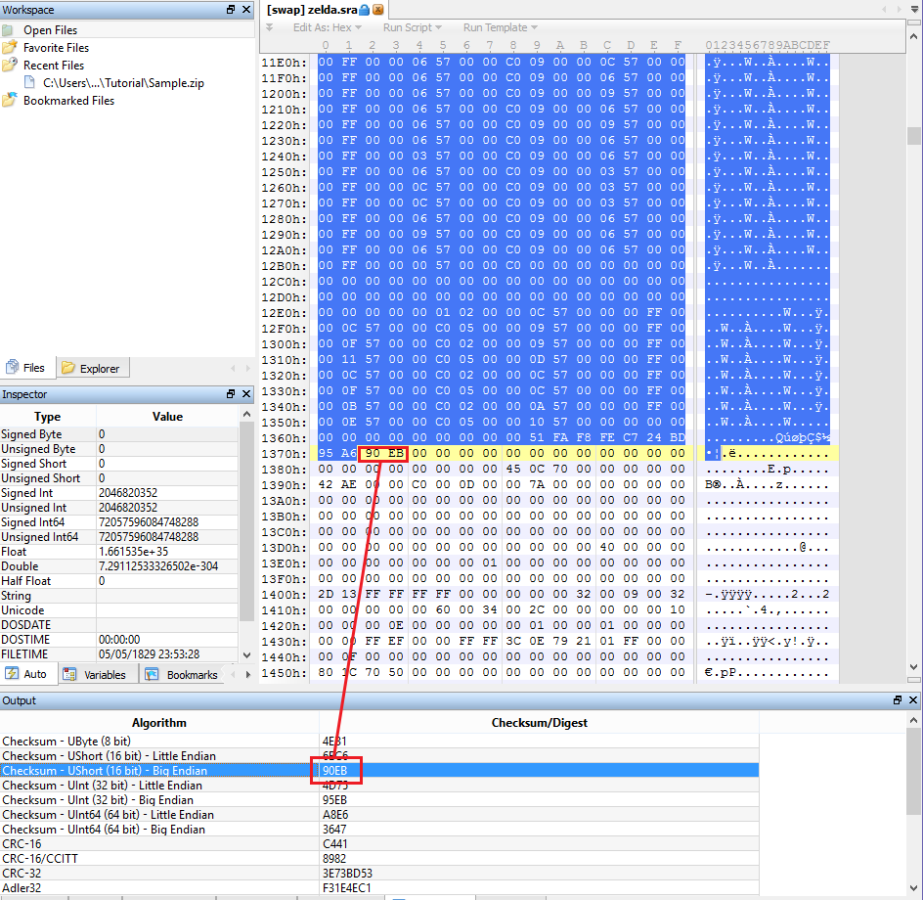
Lawrence and I were unable to find any information online about this algorithm and we wished to leave a way that others could follow these instructions using open source software. Lawrence contacted SweetScape (the company who created the 010 Editor) asking if they could make available for us more information on the algorithm used. Graeme Sweet very generously provided us with information on how “UShort (16 bit) – Big Endian” was calculated. Lawrence and I created a software tool (Ocarina Checksum Checker) to calculate the checksum of an Ocarina of Time save file in native N64 format. The working source code has been posted. The instructions on how to run and calculate it can be found on the GitHub page. We hope to develope this further.
Putting it All Together
Now that I had the correct checksum algorithm, I recalculated my memory dump and discovered that my checksum from RAM was in fact wrong. I corrected it, converted it from native N64 to something more readable (big endian -> little endian), grafted its contents into a known working Ocarina of Time save file, and loaded it up in my emulator. It worked. I was able to load up my Ocarina of Time save file on the emulator on my computer with the ROM that I had dumped and the save file I made.
 N64 with gameshark and Zelda Ocarina of Time plugged in
Final Thoughts
I managed to up-convert a younger piece of my childhood (with help) into the present digital age. I had many roadblocks and a few of my ideas were unexplored. If I had to do it all over again, I wouldn’t do it any other way. This was fun.
It didn’t take long before I learned that the community had made a high definition texture pack for specific graphic plug-ins. Of course I had to give it a try. It looks magnificent. This was the result.
I hope others found this post informational and that it may help those with old N64 saves repeat what I have done.
Materials I needed to complete my project:
- N64 & Controller
- 8 MB RAM expansion pack
- Memory pack
- GameShark (with a working parallel port)
- Parallel port cable (and a machine with a parallel port)
- N64 DexDrive (and a machine with a serial port)
Software and resources I used:
- N64RD
- 010 Editor
- uCON64
- Project64
- Zelda high definition texture pack (Known as “Zelda Ocarina of time Community Retexture Project V6”)
- Our Custom Ocarina Checksum Checker
EDIT (March 10, 2016):
Add contributions made by Austin:
- There is no easy way to communicate with the Gameshark using a parallel-to-usb adapter so you will need an older machine with a built in parallel port, like the one shown in this guide.
- You must have the expansion pack that expands the N64’s RAM from 4MB to 8MB. The only way I could get n64rd to dump the RAM while in-game was by turning on the code generator in the Gameshark’s menu before starting Ocarina of Time. This code generator option does not show up unless you have the expansion installed.
- If you’re using a downloaded ROM, make sure its version matches the version of your save. You can dump the ROM yourself as shown in the guide so that you don’t have to worry about this.
EDIT (April 29, 2016):
Add contributions made by Bkacjios:
- Bkacjios has implemented the checksum algorithm in an online tool where you can upload your RAM dump and download a proper .sra save file. It has many other features, but this simplifies the process completely after obtaining your ram dump through the GameShark cartridge and seems to be the way to go.
EDIT (May 01, 2016):
I’ve added an updated guide specifically for Ocarina of Time. Check out my new guide for it.