Discovering and Reverse Engineering My Steelcase Desk
Kyle Niewiada on August 17, 2015
9 Minute Read | Medium project
Updated on December 19, 2024
In 2013 I made the plunge for a height-adjustable standing desk. I had wanted one for a while because I was becoming restless sitting down throughout the day in my computer chair. I wanted to be able to move around easily while I was using it and not be chained to sitting. I won’t go into the health benefits or drawbacks of such a setup, but instead how I discovered and reprogrammed my desk.
2024-12-19: This desk has been with me for over a decade, but its time has passed. It no longer functions correctly 😢. I’ve been unable to fix it, so I’m keeping it around for our kids to play on with their toys.
Lucky for me, during my search for an adjustable standing desk, Steelcase was liquidating their old pyramid headquarters/test labs. You can get a pretty good look at how amazing the building and the labs were in a tour of the campus here. I contacted up the warehouse that was selling off Steelcase’s office furniture and drove on over.
In my head, my ideal desk would be one that would (1) raise and lower, (2) use no electrics, (3) be reasonably priced for such a feature list, and (4) have a short enough width to fit in my room. I had arrived at the warehouse and to my dismay learned that someone had purchased all 40 Airtouch Steelcase desks the night before (a desk that can be raised and lowered with a hydraulic not using any electricity). I had done research and found that this was the only currently available height adjustable desk that would have fit in my room.
Not being deterred, I began to browse the electric section of the height-adjustable desks in the warehouse. I thought maybe I could replan my room again. That’s when I stumbled upon a very peculiar looking desk. This desk did not show up in any standard Steelcase lineup. I pulled out my ruler and took some measurements to find that it would fit perfectly. I haggled a bit on the price, bundled in two monitor arms, and bought it.
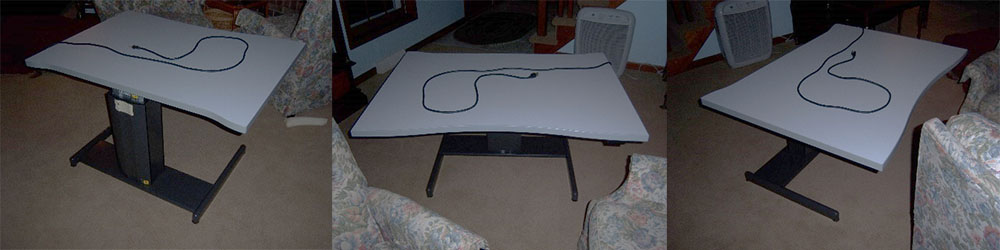 My new desk
What Exactly did I Buy?
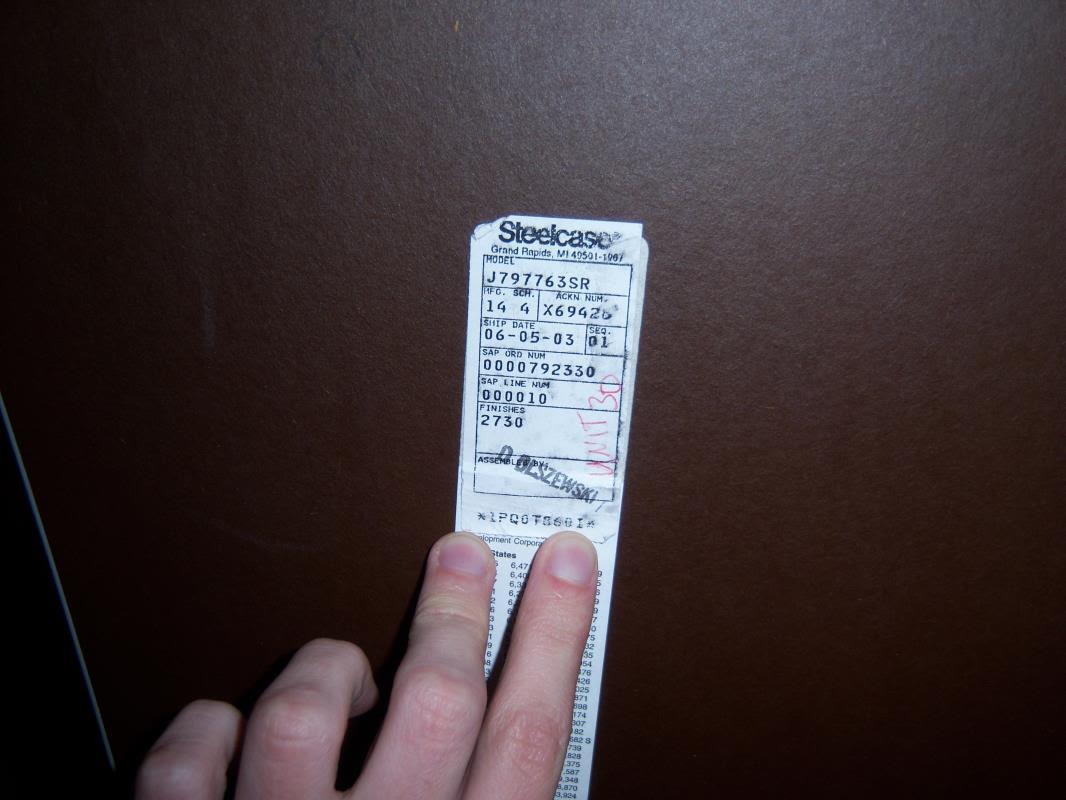
It wasn’t until I had the desk back at home that I realized I could find no listing of this unit in any Steelcase catalogs (maybe I wasn’t looking hard enough?). I got in contact with Steelcase and Andrea from the Steelcase store was able to provide:
“J797763SR. It looks like it’s for the Worksurface-Elec, straight, 48, Radius, brand:steel, product line:pathways secant”
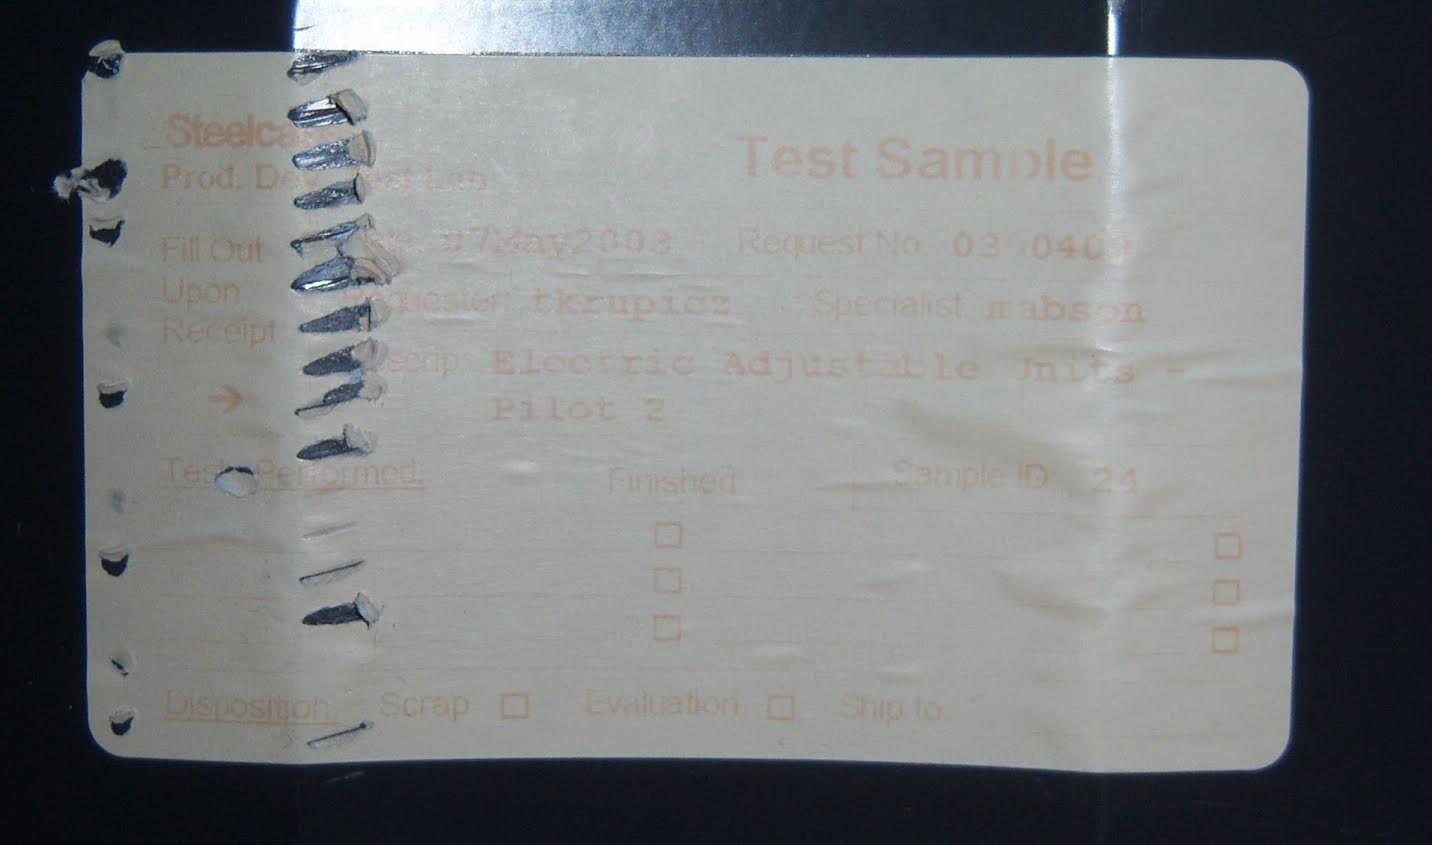
I also had discovered that what I had in my hands was a test sample. On the back of the unit was slapped a sticker that was partially pulled off. It stated that it was from the product development labs, had a fill out date of May 7, 2003, the request number, the person who requested, the specialist, the description for the unit, and the sample ID.
This might have explained why I had such an odd remote to it. I’m not sure what the lineup was like back in 2003 for Steelcase height-adjustable electric desks. I was unable to find desks that used the same remote as mine, or even a similar configuration. Given that I had a test unit, I began to wonder if there were special testing properties to the remote.
Solving a Problem
I was always annoyed with the remote on my desk because I had to hold down the programmed buttons to allow it to raise or lower. I understand that this is a safety feature to prevent children from being crushed or items being lifted off of the desk. But I was never a fan of being forced to hold down the buttons. As I’m always standing by (/badJoke) when I raise or lower it, I wanted to find a way to make this unit adjustable with a single momentary button press.
There was no documentation on my desk and I knew nearly nothing about the remote other than its more recent incarnations with a similar button layout on newer desks. I began to play with it and see if there were any hidden modes or features I was unaware of.
After a lot of trial and error, and mapping out possible and probable key combination sets, I discovered two different programming modes for my desk remote. One was temporary and the other was permanent until exited. Below are my findings (including a way to change the adjustment mode from manual to automatic!!).
Remote Modes:
Passcode Mode (P-Mode): P—
- Permanent P-Mode (Or until remote reboot): Goto PArA, Press Down 3X, Press 1 9X
- Temporary P-Mode: Goto PArA, Press III 3X, Wait 3 seconds.
PArA Mode: PArA
- To reach PArA menu, press F until display reads PArA.
- If in Passcode Mode, unplug desk, plug back in.
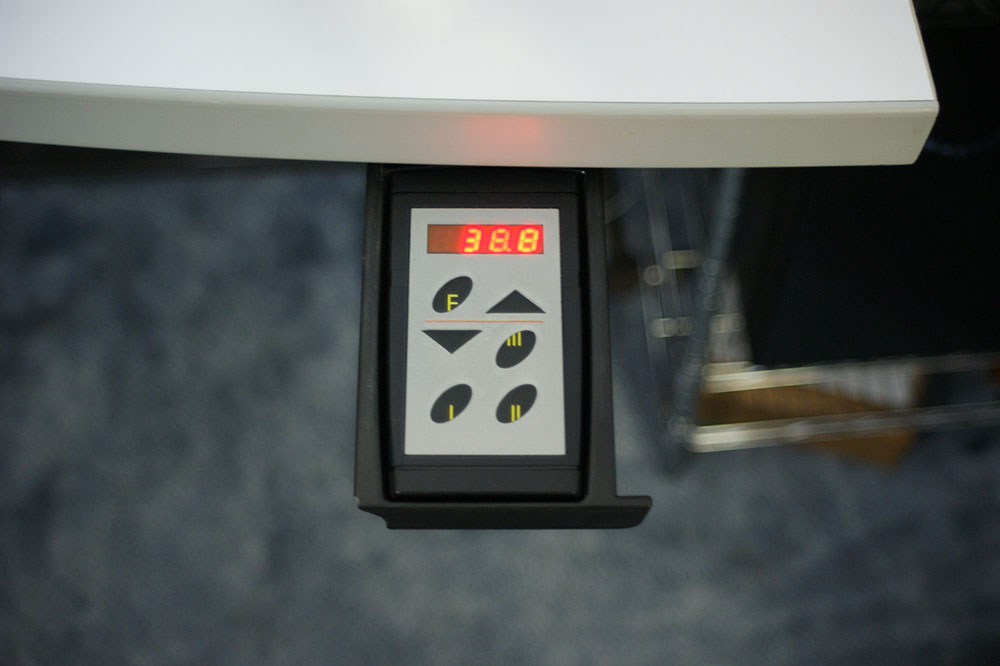 Normal Mode
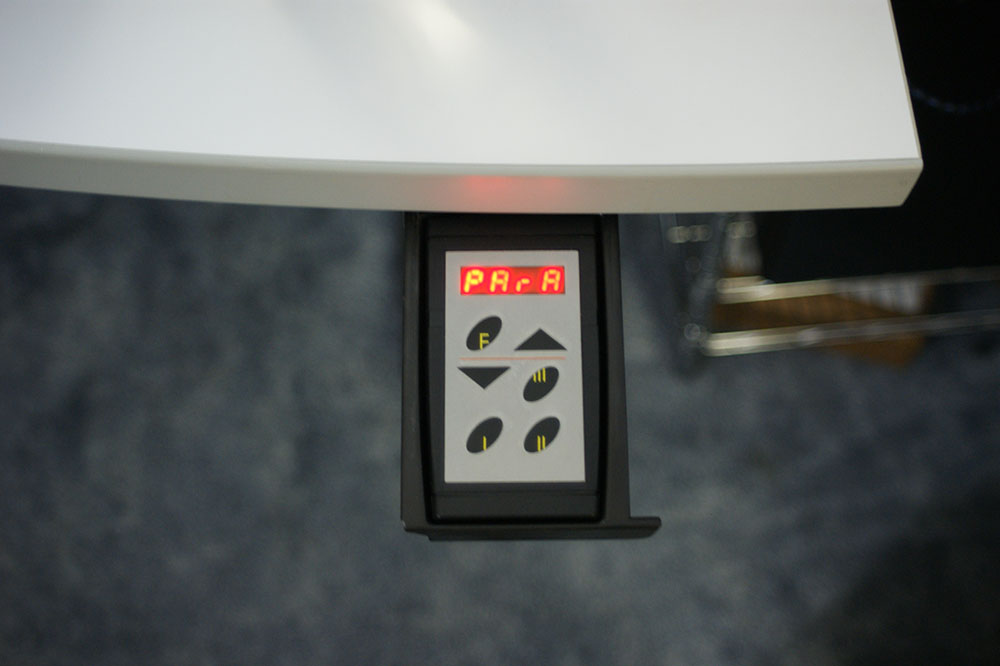 PArA mode
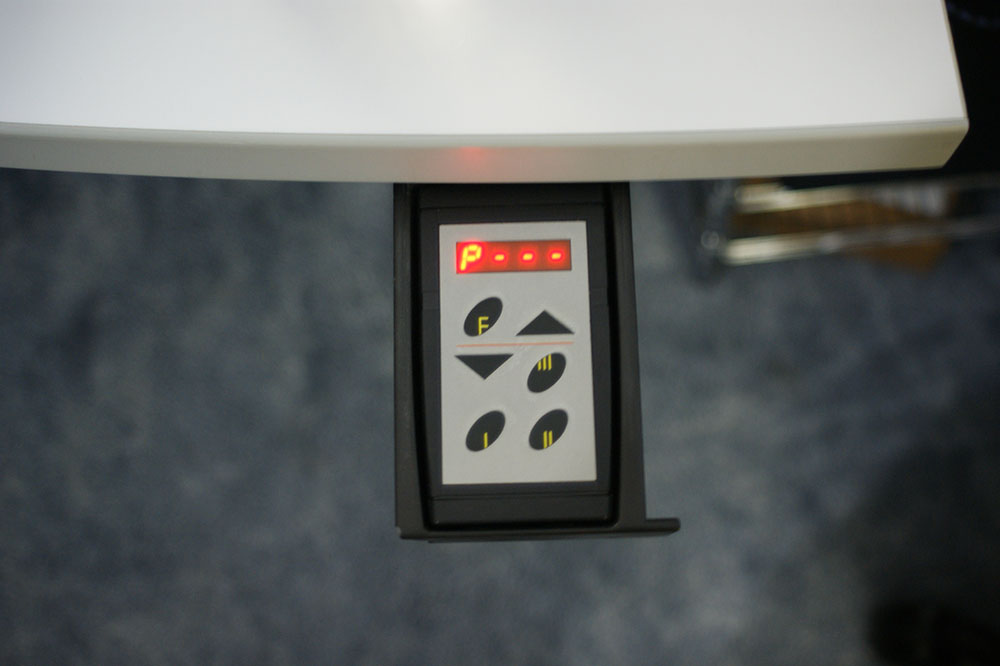 Passcode mode
| Code: | P-Mode: | PArA Mode: | Default Value (As I found it) |
|---|---|---|---|
| 111 | Set offset curve multiplier (from min) | X | 1970 |
| 112 | X | X | |
| 113 | Hand/Auto toggle (Auto travel to programmed position) | X | Hand (But I like Auto) |
| 121 | Acc.# (0-9) Distance to start decelerating from below a number? | Acc.# (0-9) Distance to start decelerating from below a number? | 4 |
| 122 | Acc.# (0-9) Distance to start decelerating from above a number? | Acc.# (0-9) Distance to start decelerating from above a number? | 4 |
| 123 | X | X | |
| 131 | Upward Speed (1-39) | Upward Speed (1-39) | 39 |
| 132 | Downward Speed (1-39) | Downward Speed (1-39) | 39 |
| 133 | Height offset for minimum height | Height offset for minimum height | 23(.)3(“) |
| 211 | LErN (Calibrates based on min (133) and max offset (111)) | LErN (Calibrates based on min (133) and max offset (111)) | |
| 212 | UrLA (Calibrates based on software defaults? 24¼” to 52”) | UrLA (Calibrates based on software defaults? 24¼” to 52”) | |
| 213 | X | X | |
| 221 | X | X | |
| 222 | X | X | |
| 223 | X | X | |
| 231 | X | X | |
| 232 | X | X | |
| 233 | X | X | |
| 311 | X | X | |
| 312 | X | X | |
| 313 | X | X | |
| 321 | Toggle USA/Eur units (for height) | Toggle USA/Eur units (for height) | |
| 322 | X | X | |
| 323 | X | X | |
| 331 | Max weight setting? Current weight setting? (0-140) | X | 70 |
| 332 | X | X | |
| 333 | SPP- (Set Program Position?) Manually set program # height | SPP- (Set Program Position?) Manually set program # height |
To calibrate desk remote display:
- Turn on desk.
- Lower desk to minimum height.
- Measure distance from the floor to the top of the desk.
- Enter code 133 in either P-Code or PArA mode.
- Change number to reflect the minimum desk height (Inches or cm pending the setup for units).
- Press F
- Raise desk to maximum height. The display will likely jump when the max height is reached.
- Measure distance from the floor to the top of the desk.
- Enter Passcode Mode (See top).
- Enter code 111.
-
Raise or lower number the number to correct your max height. The number behaves like X, where X is the number you are adjusting. My calculations and formula were based on inches. Your results might vary.
MaxHeight - MinHeight - 11.8 ---------------------------- + 1500 = X .0079059829 In my case, I would have 38.8 - 23.3 - 11.8 ------------------ + 1500 = 1968 .0079059829 - After adjusting, back out and check your latest displayed height. If the height displayed is correct, move on. If not, re-adjust step 11 again.
- Lower desk height half-way.
- Enter code 211 in either P-Code or PArA mode.
- Press F until “Init” is displayed.
- The motor will now respond slowly until calibration is completed.
- Lower desk to its minimum height.
- Raise the desk to its maximum height.
- When you reach the top, the display will change to the correct height and the calibration of the desk will be complete.
Additional Remote Toubleshooting
I recently dug up an old document that Steelcase shared with me on what they thought matched the desk remote. It includes helpful information such as remote control errors. I’ve included the original document here, as well as in the table below:
Steelcase Electric Adjustable Worksurface Memory Controller Troubleshooting Manual
| Code | Description | Corrective Action |
|---|---|---|
| ERR1 | Signal to controller is interrupted | 1. Check controller connection at motor. Make sure it is plugged in all the way and secure. 2. Check the cable of the controller. Make sure the cable is not damaged. 3. If problem continues after checking both of the above, call your Steelcase dealer for service. After the signal is re-established, ERR1 will disappear from the controller display. |
| ERR2 | Overload protection has shut the system down | Stop operation of the motor for a short period of time. The motor will automatically reset itself once a short period of time has elapsed. User can operate the motor again with five minutes. At that time, ERR2 will disappear from the controller display. |
| ERR3 | Memory signal needs to be recalibrated | The memory function needs to be re-initialized. Perform the following steps: 1. Press the “F” button. You will see “INIT” on the display. Release the button. 2. Press the “DOWN” arrow button until the motor stops at its lowest point. Release the button. 3. Press the “UP” arrow button until the motor stops at its highest point. Release the button. ERR3 will now disappear from the display and the LED display will show the correct height |
| ERR4 | 15% duty cycle is exceeded | The motor has operated for an extended period of time and has shut down. There are two possible corrective actions. 1. The motor will automatically reset itself once a short period of time has elapsed. User can operate the motor again within 5 minutes. At that time ERR4 will disappear from the controller display. 2. Disconnect the power cord from the power source for 10 seconds and re-connect. User can operate the motor again. At that time ERR4 will disappear from the controller display. |
| ERR5 | There is an open circuit. Both limit switches are in the open position | Call your Steelcase dealer for a replacement column mechanism. |
| ERR6 | Power voltage to the mechanism is low | There are two possible corrective actions. 1. The motor will automatically reset itself once a short period of time has elapsed. User can operate the motor again within five minutes. At that time, ERR6 will disappear from the controller display. 2. Disconnect the power cord from the power source for 10 seconds and re-connect. User can operate the motor again. At that time ERR6 will disappear from the controller display. |
| O112/O212 | May display when unit is first powered on | No need for alarm. This code only displays to indicate software version on the PC board within the mechanism. |
I hope that helps someone!
Conclusion
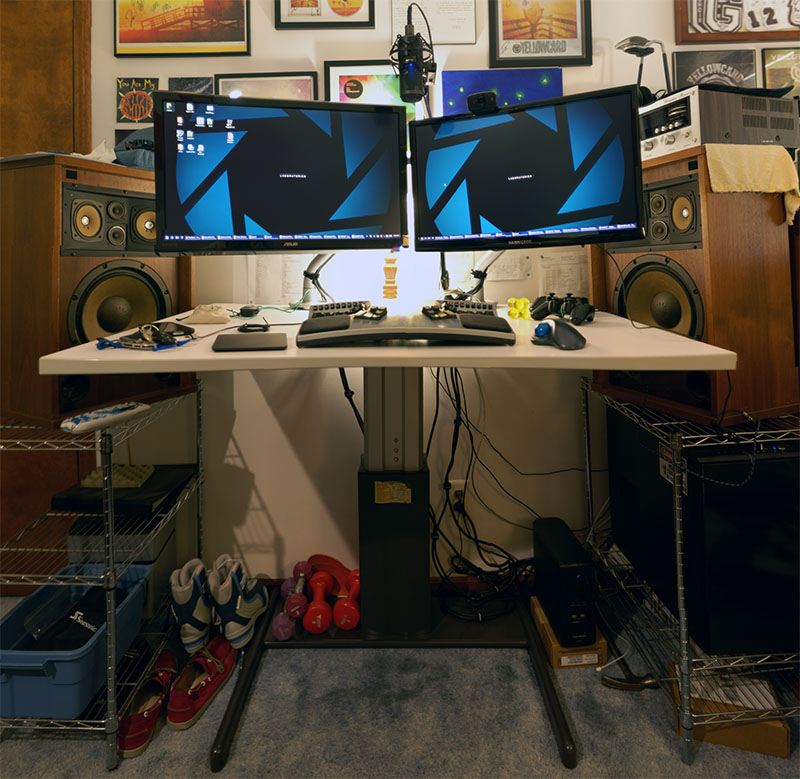
I like switching between sitting and standing when I’m at my computer. Whenever I hook up my controller and play a game, I prefer standing because I get very involved and move around. My monitors easily change position so I can readjust my workstation on the fly. It’s hassle-free. I’m glad I was able to discover the settings that could change the adjustment mode to automatic. Now that I’ve had experience with the setup, I don’t think I’ll ever be going back to full-time sitting.
Don’t knock it until you try it.