Affordable Leak Detection and Temperature Monitoring in Home Assistant
Kyle Niewiada on October 01, 2021
7 Minute Read | Medium project
Updated on August 26, 2025
Home automation should be open, affordable, and functional. I think it’s silly for devices to stop functioning if there’s a regional AWS outage or the internet goes out. As I was looking into energy monitoring solutions for my house, I stumbled upon the world of software-defined radios (SDR). I believe I have found affordable methods using an SDR to track localized weather data, monitor the refrigerator, and detect minor water leaks.
A cheap SDR can listen to oodles of devices on common RF bands. For example, devices that operate on 433 MHz can include TPMS sensors, weather sensors, or even utility meters. Thankfully, there are some terrific communities who have figured out how to decode many of the popular device signals for the average user to track.
By leveraging one of these projects, we can use our own SDR with some 433 MHz sensors to send useful information over to Home Assistant.
Post Changelog
- 2025-08-26: Add
device:blocks to MQTT sensors to tie entities under a single device.
Goals
- Track the refrigerator and freezer temps
- Possible result: Be notified when a door is left open, or the refrigerator stops working
- Track weather in the backyard
- Possible result: Be notified when the windows should be opened or closed
- Monitor areas where water leaks can occur
- Possible result: Be notified when a possible leak is detected
- Possible result: (Future goal) Shut off water main to prevent further damage
Requirements
Hardware
Here’s a list of the hardware I use and the prices I bought them at. It should help give a good idea on how much everything costs.
- $40: Nooelec NESDR Smart v4 Bundle
- $45: 5x Govee H5054 Water-Leak detectors
- $13: AcuRite 06002M outdoor temp/humidity sensor
- $37: AcuRite 00986 refrigerator thermometer display with 2 sensors
Software
Before proceeding with these projects, ensure Home Assistant is set up and has an MQTT integration. I’ll be using these projects.
- Home Assistant (I’m running the
2021.9release at the time of writing) - Mosquitto MQTT Server
- rtl_433
Setup
The brain of this operation is the rtl_433 software. You can run it as a standalone program (merbanan/rtl_433) or in a Docker container (hertzg/rtl_433_docker).
At the time of writing, I use the latest
masterbranch build since it includes support for the Govee H5054 Leak Detector.
This application receives data over the air using an SDR and decodes it. A list of supported devices can be found in the project README.md. Once the application is running, it can publish the decoded data to an MQTT server where we can ingest it into Home Assistant.
In the examples below we are going to use it for some AcuRite sensors and Govee water-leak detectors mentioned earlier.
Running rtl_433
Something like this should get you off the ground, scanning for data, and pushing the results to the MQTT server.
rtl_433 -R 40 -R 41 -R 192 -F "mqtt://<<MQTT_IP>>:8883,user=<<USERNAME>>,pass=<<PASSWORD>>,retain=1,devices=rtl_433[/model][/id],events=rtl_433[/model][/id]"
The
-R 40 -R 41 -R 192restrict the config to only look for our specific device types. That helps cut down on extra noise.
If everything starts, it might look something like this in the logs:
Publishing MQTT data to <<MQTT_IP>> port 8883
Publishing device info to MQTT topic "rtl_433[/model][/id]".
Publishing events info to MQTT topic "rtl_433[/model][/id]".
Registered 3 out of 192 device decoding protocols [ 40-41 192 ]
Detached kernel driver
Found Rafael Micro R820T tuner
Exact sample rate is: 250000.000414 Hz
[R82XX] PLL not locked!
Sample rate set to 250000 S/s.
Tuner gain set to Auto.
Tuned to 433.993MHz.
Allocating 15 zero-copy buffers
MQTT Connected...
MQTT Connection established.
Great! Everything connects and we can start receiving data from our devices.
Localized Weather Data
My preferred localized weather sensor is the AcuRite 06002M outdoor temp/humidity sensor. At $13 I would be hard-pressed to find any sensor more affordable without taking days to plan, program, and build. Just throw in some fresh batteries, tie a piece of string around it, and hang it in the backyard.
I find the sensor to be fairly accurate and it broadcasts a signal every 30 seconds.
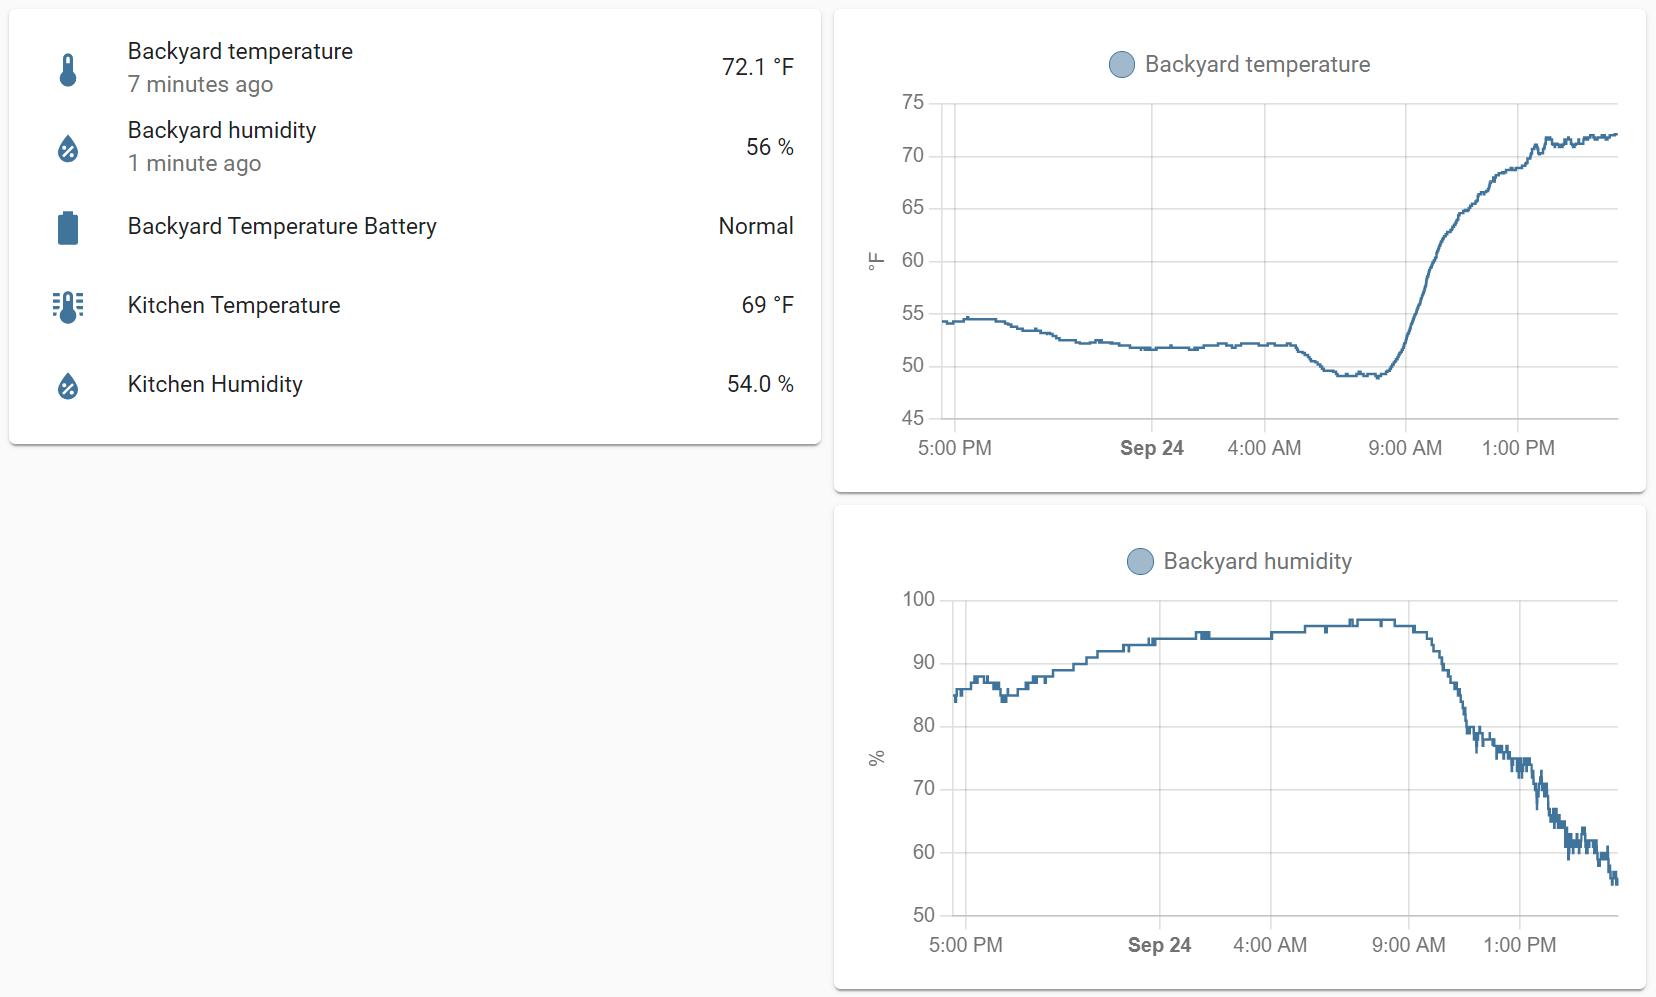 AcuRite 06002M sensor data in Home Assistant
Here’s my Home Assistant config. It provides the sensor’s temperature, humidity, and battery status. Even though these sensors report in °C, Home Assistant settings can automatically convert the values to the preferred units in the dashboard.
# Your sensor ID will vary. I've put in a placeholder of 5555 below.
mqtt:
  binary_sensor:
    - state_topic: rtl_433/Acurite-Tower/5555/battery_ok
      json_attributes_topic: rtl_433/Acurite-Tower/5555
      device_class: battery
      name: "Backyard Temperature Battery"
      unique_id: backyard_temperature_battery
      payload_on: 0
      payload_off: 1
      device:
        identifiers: ["backyard_sensor"]
        name: "Backyard Sensor"
        manufacturer: "AcuRite"
        model: "06002M"
        suggested_area: "Backyard"
  sensor:
    - state_topic: rtl_433/Acurite-Tower/5555/temperature_C
      json_attributes_topic: rtl_433/Acurite-Tower/5555
      device_class: temperature
      state_class: measurement
      name: "Backyard temperature"
      unique_id: backyard_temperature
      unit_of_measurement: "°C"
      device:
        identifiers: ["backyard_sensor"]
        name: "Backyard Sensor"
        manufacturer: "AcuRite"
        model: "06002M"
        suggested_area: "Backyard"
    - state_topic: rtl_433/Acurite-Tower/5555/humidity
      json_attributes_topic: rtl_433/Acurite-Tower/5555
      device_class: humidity
      state_class: measurement
      name: "Backyard humidity"
      unique_id: backyard_humidity
      unit_of_measurement: "%"
      device:
        identifiers: ["backyard_sensor"]
        name: "Backyard Sensor"
        manufacturer: "AcuRite"
        model: "06002M"
        suggested_area: "Backyard"
Refrigerator and Freezer Monitoring
The AcuRite 00986 refrigerator thermometer includes a magnetic display and two sensors. One sensor for the freezer, one sensor for the fridge, and a magnetic display to track min/max values or sound an alarm.
It’s a bit more expensive than the other sensors, but it continues working with the display after the power goes out (which is super valuable to me).
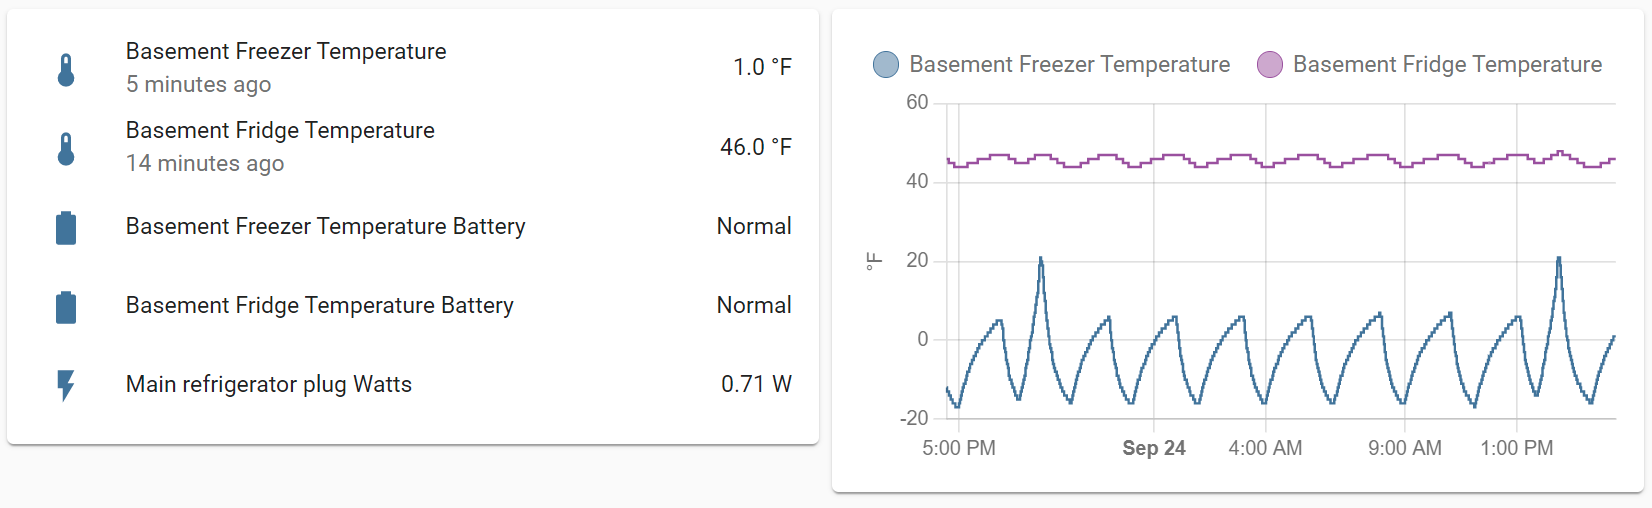 AcuRite 00986 refrigerator and freezer temps in Home Assistant
# Your sensor IDs will vary. I've put in placeholders of 54321 and 98765 below.
mqtt:
  binary_sensor:
    - state_topic: rtl_433/Acurite-986/54321/battery_ok
      json_attributes_topic: rtl_433/Acurite-986/54321
      device_class: battery
      name: "Basement Fridge Temperature Battery"
      unique_id: basement_fridge_temperature_battery
      payload_on: 0
      payload_off: 1
      device:
        identifiers: ["basement_fridge"]
        name: "Basement Fridge Sensor"
        manufacturer: "AcuRite"
        model: "06002M"
        suggested_area: "Storage"
    - state_topic: rtl_433/Acurite-986/98765/battery_ok
      json_attributes_topic: rtl_433/Acurite-986/98765
      device_class: battery
      name: "Basement Freezer Temperature Battery"
      unique_id: basement_freezer_temperature_battery
      payload_on: 0
      payload_off: 1
      device:
        identifiers: ["basement_freezer"]
        name: "Basement Freezer Sensor"
        manufacturer: "AcuRite"
        model: "06002M"
        suggested_area: "Storage"
  sensor:
    - state_topic: rtl_433/Acurite-986/54321/temperature_F
      json_attributes_topic: rtl_433/Acurite-986/54321
      device_class: temperature
      state_class: measurement
      name: "Basement Fridge Temperature"
      unique_id: basement_fridge_temperature
      unit_of_measurement: "°F"
      device:
        identifiers: ["basement_fridge"]
        name: "Basement Fridge Sensor"
        manufacturer: "AcuRite"
        model: "06002M"
        suggested_area: "Storage"
    - state_topic: rtl_433/Acurite-986/98765/temperature_F
      json_attributes_topic: rtl_433/Acurite-986/98765
      device_class: temperature
      state_class: measurement
      name: "Basement Freezer Temperature"
      unique_id: basement_freezer_temperature
      unit_of_measurement: "°F"
      device:
        identifiers: ["basement_freezer"]
        name: "Basement Freezer Sensor"
        manufacturer: "AcuRite"
        model: "06002M"
        suggested_area: "Storage"
Water-Leak Detection
The sensor I chose for water-leak detection is an interesting one. The Govee H5054 water-leak detector does not advertise itself is a 433 MHz device. In fact, they encourage you to buy their Wi-Fi gateway hub to receive alerts. Luckily, none of the functionality requires the Wi-Fi Gateway.
The device broadcasts its encoded signals around 433 MHz. It still detects water and can be silenced with the button without ever “pairing” to their gateway.
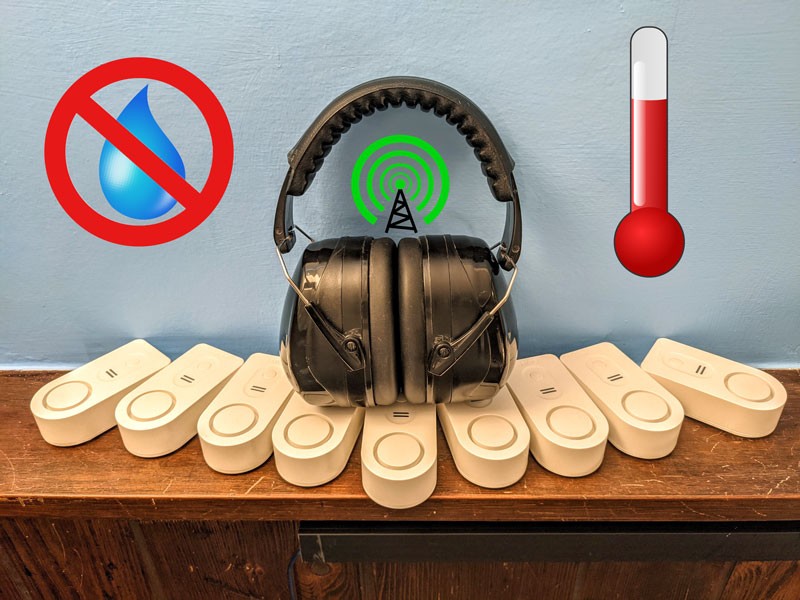
Shameless plug; I helped figure out how to validate the parity check with this device when rtl_433 receives the data. Doing so helps avoid any corrupt or false positives from similar signals. This led to a long day of development with safety earmuffs on to block out the leak detector alarms as I tested signals.
Check out both pull requests!
Why did I choose this water-leak detector?
- IP66 rated
- 100db on-device alarm
- Physical button to turn off alarm
- Standard batteries (2x AAA)
- Affordable (as little as $8 when purchased in 5-packs)
The Govee H5054 water-leak detector sends a signal when:
- Water is detected across any of its contacts
- The button is pressed
- There has been a major change in the battery since the last battery event
- Batteries are first inserted
There are reports that older devices send an occasional heartbeat signal but that has since been removed in later revisions.
With the configuration below Home Assistant will register the sensor as wet when moisture is detected. The user must press the physical button on the Govee water-leak detector to change the Home Assistant sensor back to dry. This ensures the “leak event” has been investigated.
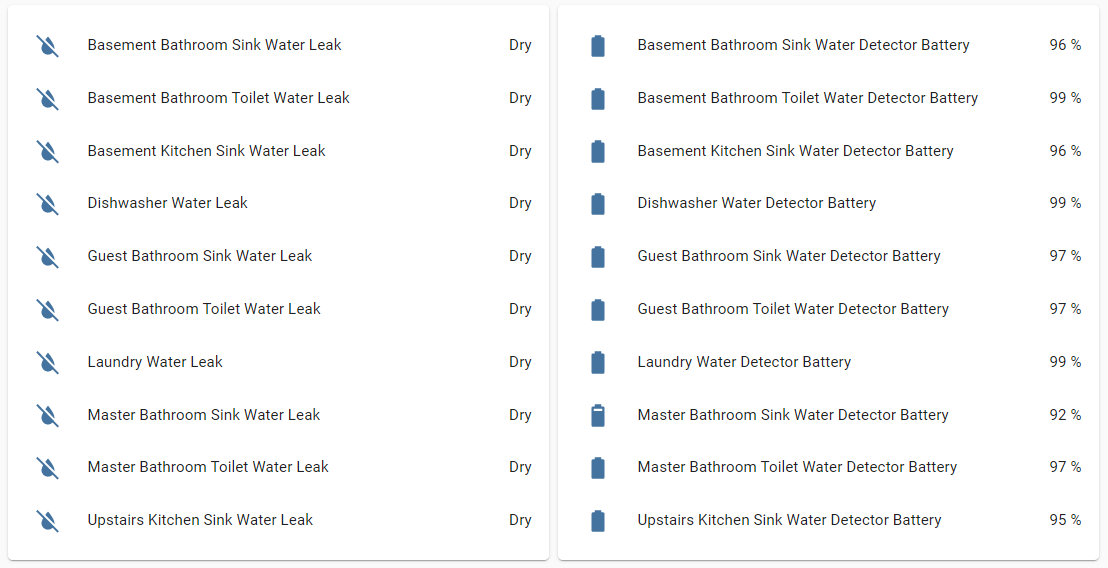 Govee H5054 water-leak detector data in Home Assistant
#
# Your sensor ID will vary. I've put in a placeholder of 88888 below.
mqtt:
  binary_sensor:
    - state_topic: rtl_433/Govee-Water/88888/event
      json_attributes_topic: rtl_433/Govee-Water/88888
      device_class: moisture
      unique_id: 88888_govee_water
      name: Dishwasher Water Leak
      payload_on: Water Leak
      payload_off: Button Press
      device:
        identifiers: ["dishwasher"]
        name: "Dishwasher Water Detector"
        manufacturer: "Govee"
        model: "H5054"
        suggested_area: "Kitchen"
  sensor:
    - state_topic: rtl_433/Govee-Water/88888/battery_ok
      json_attributes_topic: rtl_433/Govee-Water/88888
      device_class: battery
      state_class: measurement
      value_template: "{{ (value_json | float * 100) | int }}"
      unique_id: 88888_govee_water_battery
      name: Dishwasher Water Detector Battery
      unit_of_measurement: "%"
      device:
        identifiers: ["dishwasher"]
        name: "Dishwasher Water Detector"
        manufacturer: "Govee"
        model: "H5054"
        suggested_area: "Kitchen"
#
Alerts for All
Since we have the temperature and water-leak detection monitored, it makes sense to set up automations so we can ignore our dashboard. Here are some helpful Home Assistant automations and blueprints I use to get started.
Blueprint: Alerts on Water-Leaks
Send an alert if any moisture class device changes to wet.
#
blueprint:
  name: Leak detection & notifier
  description: Send a notification when any configured moisture sensor becomes moist
  domain: automation
  input:
    actions:
      name: Actions
      description: Notifications or similar to be run. {{ trigger.event.data.new_state.attributes.friendly_name }} is replaced with
        the name of triggered device that is moist.
      selector:
        action: {}

trigger:
  - event_data: {}
    event_type: state_changed
    platform: event

condition:
  - condition: template
    value_template: '{{ (trigger.event.data.new_state.attributes) and (trigger.event.data.new_state.attributes.device_class == "moisture") }}'
  - condition: template
    value_template: '{{ trigger.event.data.new_state.state == "on" }}'

action:
  - choose: []
    default: !input 'actions'

mode: single
#
Automation: Alerts on Warm Freezer Temp
Just a simple automation to alert the user if the freezer temperature is too high.
#
alias: Temperature Alert - Freezer
description: Send a notification if the temperature in the freezer is too high
trigger:
  - platform: time_pattern
    minutes: '5'
condition:
  - condition: numeric_state
    entity_id: sensor.basement_freezer_temperature
    above: '30'
action:
  - service: notify.notify
    data:
      message: >-
        The freezer temperature is too high at {{
        states('sensor.basement_freezer_temperature') }}
      title: 🌡️ Freezer Temperature is too high!
mode: single
#
Blueprint: Alerts for Device Healthcheck
This is one of my favorite blueprints. Since I’m using the rtl_433 project to push device states over MQTT, I can choose to include a timestamp with the event. The blueprint loops through all temperature and battery devices and checks if their time attribute (if it exists) is within a specific timeframe.
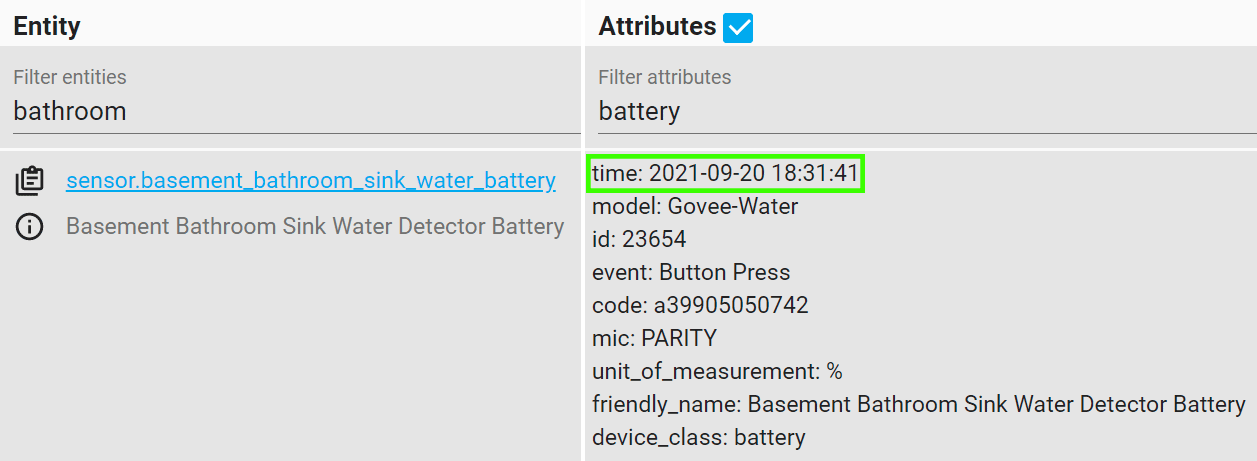 Govee Water-leak sensor attributes in Home Assistant
I would like to know if a device battery dies, the sensor stops working, or there is a signal failure. I can do that by predicting when I expect to hear another signal.
For the AcuRite sensors, they send signals and highly regular intervals. It’s easy to anticipate.
But the Govee water-leak sensors no longer ship with a heartbeat signal. My only semi predictable updates from those devices will come when there is a significant battery change. I anticipate it will be a few months before I hear another signal from them.
By ensuring I anticipate both regular and semi regular events, I can predict whether or not my devices are still operating.
#
blueprint:
  name: Healthcheck for SDR (rtl_433) sensors
  description: Send a notification when SDR (rtl_433) sensors haven't sent a message in a while.
  domain: automation
  input:
    temp_healthcheck:
      name: Temperature Sensor Healthcheck
      description: How many hours until we consider a temperature sensor unresponsive.
      default: 12
      selector:
        number:
            min: 1
            max: 24
            unit_of_measurement: hours
            mode: box
    battery_healthcheck:
      name: Battery Sensor Healthcheck
      description: How many days until we consider a battery sensor unresponsive (like in water sensors).
      default: 180
      selector:
        number:
            min: 1
            max: 365
            unit_of_measurement: days
            mode: box
    actions:
      name: Actions
      description: Notifications or similar to be run. {{sensors}} is replaced with
        the names of sensors that are no longer checking in.
      selector:
        action: {}

variables:
  temp_healthcheck: !input temp_healthcheck
  battery_healthcheck: !input battery_healthcheck
  sensors: >-
    {% set result = namespace(sensors=[]) %}
    {% for state in states.sensor | selectattr('attributes.device_class', '==', 'temperature') %}
        {% if (as_timestamp(now()) | int - as_timestamp(state.attributes.time | default(now())) | int) > (60 * 60 * temp_healthcheck) %}
          {% set result.sensors = result.sensors + [state.name] %}
        {% endif %}
    {% endfor %}
    {% for state in states.sensor | selectattr('attributes.device_class', '==', 'battery') %}
        {% if (as_timestamp(now()) | int - as_timestamp(state.attributes.time | default(now())) | int) > (60 * 60 * 24 * battery_healthcheck) %}
          {% set result.sensors = result.sensors + [state.name] %}
        {% endif %}
    {% endfor %}
    {{result.sensors|join(', ')}}

trigger:
  - platform: time_pattern
    minutes: '/5'

condition:
  - '{{ sensors != '''' }}'

action:
- choose: []
  default: !input 'actions'

mode: single
#
Final Thoughts
By adding these hands-off automations, I can deploy my devices and ignore them until I am notified of potential problems. Home automation should be open, affordable, and functional. Using a cheap SDR with a handful of 433 MHz devices provides an affordable alternative for those wanting to avoid cloud subscriptions or internet dependent devices.