Hacking Voice & WiFi Control into My Dumb Noise Machine
Kyle Niewiada on February 27, 2019
8 Minute Read | Medium project
Updated on May 29, 2025
Picture this. It’s night time. You’re winding down and the end of a long work day getting for sleep. You climb into bed and pull the cozy covers up to your neck. Rolling over, you whisper a command to your digital assistant to turn off the lights. The room goes dark but something feels different.
A creaking noise of the house cuts through your silent slumber as the duct above expands with the furnace. Pestering you awake, it dawns on you that you’ve forgotten to turn on the noise machine.
The trek is cold and dangerous. After gathering the willpower, you slide out of the bed. Your feet scurry across the frozen carpet until reaching the pedestal under then noise machine. The button clicks after a quick press and your hand coils back into its warm sleeve. It brings to life an orchestra of synthetic crickets. You can now sleep in peace.
What if you never needed to make that dangerous trek? Your feet could stay warm, the monsters couldn’t grab you, and your hand could stay under your pillow? That’s a question I asked myself all winter long. Eventually, I decided to do something about that. I wanted to control my noise machine using my voice.
Solving a Fabricated Nuisance
It’s no secret that I love using my voice. I sing along to custom soundtracks in Beat Saber (here’s my Score Saber plug), and I write large portions of these posts using dictation software. For this reason, I wanted to set a primary goal of controlling my noise machine using my voice. Bonus points if I could get it to integrate with my favorite home automation platform, Home Assistant.
Since my Home Assistant instance is already connected to my Google Home, I could expose and control any Home Assistant entity to Google as a controllable device. This means easier voice integration.
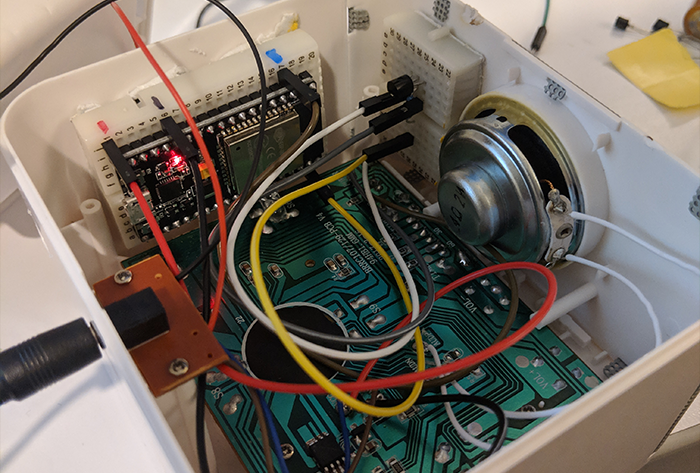
The first thing I had to do was disassemble my noise machine to see what I was up against. I scraped off the bottom foam feet, sourced myself a skinny screwdriver, and went to work at removing the screws. Once I was inside, I found how much empty space I had to work with. A lot! I took a look at the board and it had a very forgiving soldering pins. This excited me.
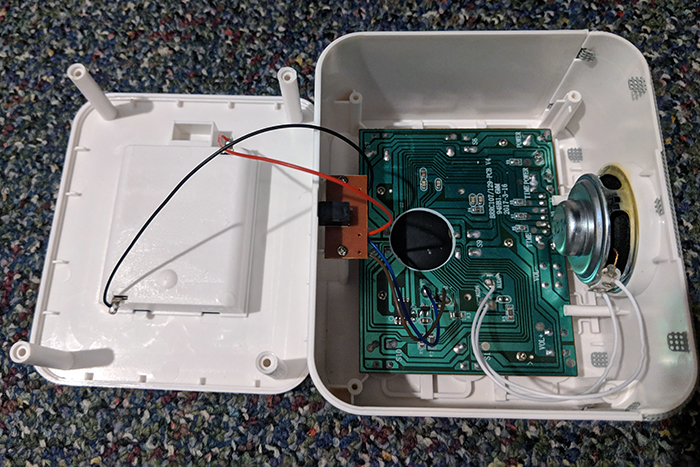 Empty noise machine before hacking it
Before progressing, I wanted to make sure all the pieces I needed were available. I pulled out my multimeter and began to investigate how the box worked. Conveniently, the box is powered with a 5V line with batteries as a backup. With my super basic extreme electronic skills, I noticed that if I bridged the connections on the button, it would trigger its action–so like… a normal button. Simple enough, right?
At this point, it dawned on me that a friend had gifted me an ESP32 board for Christmas a few years back. Until now, I hadn’t thought of a good project for it. Due to the generous space inside the noise machine, I knew it would be possible to fit an amateur wiring job inside without too many issues and possibly control the box.
Prototyping
After a quick Google search, I learned that the Home Assistant platform that recently launched an ESPHome integration. Lucky for me, ESPHome supports for my board! A quick firmware flash and Home Assistant integration change later, I was able to produce a proof of concept that toggled an LED bulb on the ESP32 through the control of my Home Assistant front-end.
Lucky for me, the ESP32 board that I was using required a 5V power source. Conveniently, the noise machine was already using a 5V line for its main power. I just tapped into that and it worked perfectly. I don’t think I’m drawing enough current to cause any problems.
Perfect. It looked like all the pieces were going to line up. I just had to figure out how to create a circuit using the ESP32 that would trigger a button press. A quick search online suggested that these button presses could be bypassed by using an NPN transistor to behave like a switch. This would allow me to change the voltage passing between the two button terminals.
I needed some parts, so I visited my neighbor to borrow two transistors. While over there, I had my breadboard sliced in half so it would fit inside the noise machine. Once I returned home, I tossed a bunch wires together, positioned my transistor and suddenly had a working prototype.
Because I don’t work on projects like this very often, I had a measly supply of resistors and nonexistent supply of transistors/wires. Honestly, this was probably the best time for me to stock up on proper parts like this. I put in an order and anxiously waited for them to arrive.
Building
Since we live in the future, the order took less than 48 hours to arrive. Once I had all my new parts opened, I went to work.
I’m nowhere near experienced at this work. I like to think I’m competent enough to get by. If you’re trying to follow along at home, I’d advise against it. I have no idea what I’m doing.
Here’s a high level overview (I tried my best) showing my circuit. I’m not quite sure how to represent everything very well…
 A high level look at the ESP32 circuit controlling my noise machine power state
Almost immediately I thought I had my circuit ready. But something wasn’t quite right. With my circuit connected, if I tried to use the physical button on the machine, it wouldn’t work. I realized I had probably created a parallel circuit so now the connection was going the path of least resistance.
Trying to come up with a solution, I attempted to swap the NPN transistor with a PNP variant. But that was heading in the wrong direction and didn’t work. Backtracking, I swapped out the first transistor for one with that could handle a little more power. I used the highest rated NPN transistor from my variety pack. In my case, this happened to be the 2N2222.
With my new circuit at hand, I was ready to test. But then nothing happened. I was befuddled. Like many people online, I was running a 1K ohm transistor into the base of my transistor. But it wasn’t doing anything. Okay, maybe my GPIO pin from the ESP32 was still putting out too much current into the transistor base?
I grabbed a higher rated resistor from my bag, this time 220k ohm. Why did I pick that one? It was the first bag of resistors on top of my pile that was greater than 1K ohm. Besides, what did I have to lose by using a transistor with too much resistance (besides burning it out)?
In the most anti-climactic fashion, it worked. My machine could both be triggered from the physical button, and the GPIO pin on my ESP32. I was almost ready to put it back together. There were just a few loose ends I needed to tie up.
Extra Credit
First, I wanted to add in a small LED that would let me know when my circuit triggered. This would help me debug if something wasn’t working correctly. I slapped on a green LED, added some code to ensure it went off at the same time. Piece of cake.
In addition to adding a status LED for my commands, I also did something super hacky. I noticed there was an open pad on the circuit board inside my noise machine. This open pad allowed me to tap into any voltage passing through the power LED. Can you guess where I’m going with this?
I soldered a wire to that pad and connected it to an input pin on my ESP32. Now whenever the device was on, I could read the voltage from the power LED’s circuit and know for certain what its state was. This would allow me to reflect in the Home Assistant user interface if someone had turned the noise machine on with the physical button so that the UI toggle would correctly represent the machine’s state.
Check out the video demo where I control the noise box with my voice. Don’t worry, I muted the Google hot phrase!
Conclusion
Thankfully, my Home Assistant instance already had a Google Home integration. This meant once I had the ESP32 module connected using ESPHome, I only needed to expose the entity to Google.
Voice control was now a success. My dumb noise machine went through a transformation stuffed with wires and an ESP32 module. No more decisions needed to be made on whether I wanted to suffer with the creaking all night, or end up dashing across the frozen carpet to turn it on. My dumb smarter noise machine was fully controllable from my cozy warm bed.
Source Code
Here’s the source configuration of my ESP32 board if anyone wants to try this, or use some of it to control their own devices.
# Updated for 2025.5.0

substitutions:
  board_id: esp-32-00
  name: noise-machine
  friendly_name: Noise Machine
  deviceid: noise_machine

wifi:
  ssid: !secret wifi_ssid
  password: !secret wifi_password

  # Enable fallback hotspot (captive portal) in case wifi connection fails
  ap:
    ssid: "${board_id} Hotspot"
    password: !secret ap_hotspot_password

  reboot_timeout: 6h

# Enable captive portal if wifi ever changes
captive_portal:

# Enable Home Assistant API
api:
  encryption:
    key: !secret encryption_pre_shared_key

ota:
  platform: esphome
  password: !secret ota_password

esphome:
  name: ${name}
  comment: ${board_id}
  friendly_name: ${devicename}
  on_boot:
    priority: 600
    # Force the Green LED state upon boot in case it is stuck
    then:
      - switch.turn_on:
          id: event_led
      - delay: 500ms
      - switch.turn_off:
          id: event_led

esp32:
  board: nodemcu-32s

# Enable logging
logger:

sensor:
  - platform: adc
    pin: GPIO36
    id: ${deviceid}_voltage
    name: LED Voltage
    internal: true
    update_interval: 2s

switch:
- platform: gpio
  pin:
    number: 23
  id: ${deviceid}_pin
  restore_mode: ALWAYS_OFF
  internal: true
  name: ${deviceid}_pin
- platform: gpio
  pin:
    number: 21
  id: event_led
  internal: true
  name: event_led
- platform: template
  name: None
  icon: mdi:volume-high
  lambda: |-
    if (id(${deviceid}_voltage).state > 0.5) {
      return true;
    } else {
      return false;
    }
  turn_on_action:
    then:
      - if:
          condition:
            lambda: 'return id(${deviceid}_voltage).state <= 0.5;'
          then:
            - switch.turn_on:
                id: ${deviceid}_pin
            - switch.turn_on:
                id: event_led
            - delay: 500ms
            - switch.turn_off:
                id: ${deviceid}_pin
            - switch.turn_off:
                id: event_led
  turn_off_action:
    then:
      - if:
          condition:
            lambda: 'return id(${deviceid}_voltage).state > 0.5;'
          then:
            - switch.turn_on:
                id: ${deviceid}_pin
            - switch.turn_on:
                id: event_led
            - delay: 500ms
            - switch.turn_off:
                id: ${deviceid}_pin
            - switch.turn_off:
                id: event_led
# Disable status LED as it's annoying to have blink in the middle of the night when power is out/on vacation with it.
#status_led:
#  pin:
#    number: 2