The Smart Coaster That Keeps Me Hydrated
Kyle Niewiada on February 23, 2025
24 Minute Read | Small project
Updated on June 17, 2025

I keep forgetting to drink water. Between the consecutive meetings and blocks of coding, my water intake has slipped. In the mere blink of an eye, my afternoon passes by, and I end up in a dehydrated wasteland. The solution seems so easy. Drink more water! But it’s a recurring battle. My tendency to hyper-focus leaves me parched. So how do I fix this?
Do I set a timer? Should I buy a luxurious smart water bottle? Should I research the best water tracking app for my phone?
Or should I throw a bunch of glue, wood, and my favorite electronics together to construct something new? ✨
In an effort to quickly deliver value, join me on my self-imposed 48-hour project.
Table of Contents
Changelog:
- 2025-06-17: I completed my wishlist and created a second (more ascetic) version of the smart coaster. See my update below.
Possible Solutions
Let’s start with the easiest way to fix my problem. Buying someone else’s solution. 💸
I barely spent any time researching these solutions before I pivoted to my own. If I missed a good option, it was in the name of “getting something done”. 🤷♂️
Water Tracking Apps
The first possible solution I came across was a water tracking app. The idea is that you buy (or subscribe to) an app that reminds you to drink water. It’s a simple concept. You drink water; you log it in the app. When you fall behind, the app reminds you to drink more water.
But I loathe this idea. It’s so… manual. I suppose some apps lessen the work by adding a widget to your phone’s home screen. Or others add a tappable action in the notification. But it sounds so tedious. I want to touch my phone less. Not more. Let’s not feed the attention monster more than we have to. 📱👾
Smart Water Bottles
This one is kinda cool. A Bluetooth smart water bottle that tracks your water intake. The one example I looked at uses an internal load cell sensor to measure the liquid (remember this for later).
When the measured weight of the liquid goes down, the bottle assumes you drank water. If you’re not drinking enough, you’ll get a notification on your phone. Ignoring the price, it’s a neat idea.
 My rendition of what a smart water bottle could look like.
But how do we power such a magical device?
Batteries.
Do you know what happens to devices that run on batteries?
They run out. And then you have to charge them. And then you forget to charge them. And then you forget to drink water. 🪫 So the whole thing works great as long as you remember to keep it charged.
Ignoring that hyper-dramatic scenario for a moment, let’s dream about how we could fix this for our situation.
What if we could take one of those magic battery-powered water bottles and build some kind of smart coaster to dock into? This smart coaster would live on your desk and could keep the smart bottle charged. I bet such a device could even offer pass-through charging to keep the battery in a healthy state.
Wait.
That’s a great idea.
Let’s build a smart coaster.
A Smart Coaster?
What if I took the components of a smart bottle and put them in a coaster? I could leave the coaster plugged in, and now there are no more battery problems!
Does anyone sell such a magical device? 🧙♂
Not that I could find! So let’s build one.
 A really smart coaster
Researching the Build
If I’m going to build a smart coaster, I want it to:
- Intelligently remind me to drink water
- Integrate with my existing smart home setup (preferably using Home Assistant and ESPHome)
Load Cells
Playing off of the idea above, what if I use a load cell to measure the weight of the water bottle? I could then track the volume of liquid consumed and notify me if I’ve fallen behind on my goal.
From my 5 minutes of research, I found that load cells come in a variety of form factors. But if I wanted a nice flat coaster, I’d need a flat or low-profile load cell.
Pretending for a moment that I could find the perfect small flat load cell (at an affordable price), I’d still need to find a way to integrate it with ESPHome.
But there’s more. I’d have to calibrate the load cell to the bottle. And what if I switch bottles? Or cups? Or mugs? 🤯
Refocusing on the Problem
We’ve gone off course. All of the solutions we’ve looked at so far are trying to solve how much water I drink. But that’s not the root problem.
I really have an attention problem.
If I remember to drink water, I have no problem consuming it. I just need that little nudge to think about it.
Instead of trying to detect how much liquid is in a bottle, let’s just try to detect if a bottle is present.
Full disclosure: A load cell can excel at detecting if something is present. But I don’t think the load cell would have been as compact as my final solution, and it would cost a bit more.
Ultrasonic 🔵🦔 Sensor
The first sensor that came to my mind for presence detection was the trusty ultrasonic sensor. It’s a sensor that shoots out a sound wave and listens for the echo. If it hears the echo, it knows something is there (and can also determine the distance).
But most of these sensors are a bit bulky and might not fit into my design. There’s also the chance of noise interferences with sound waves bouncing off other objects.
Want to know what’s cooler than bouncing sound waves off objects? Bouncing light waves off objects. 🌈🦄
Lasers
Meet the VL53L0X. This range sensor utilizes a laser and a detector to precisely measure the time it takes for light to reflect off an object. In most board designs, the VL53L0X achieves remarkable compactness, enabling its use in space-constrained applications.
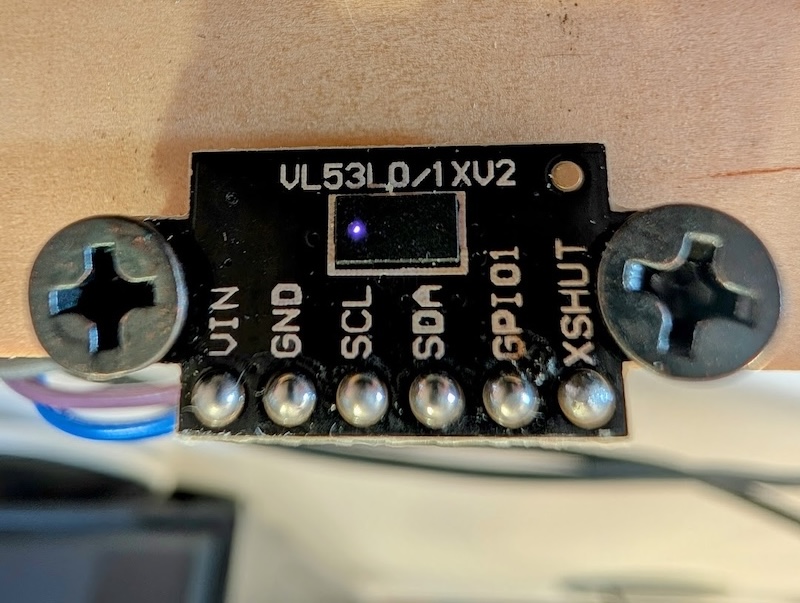 VL53L0X ToF sensor
The VL53L0X is also supported by ESPHome, which makes it a perfect candidate for my smart coaster. 🥇
Planning the Build 🗺️
My plan is to mount a VL53L0X ToF (Time of Flight) sensor facing the water bottle to detect if anything is present.
(Simplified) Rules:
- If the bottle is present, a timer will start.
- If I pick up the bottle, the timer will start over.
- If the timer runs out, I’ll get a notification to drink water.
I’ll plug the sensor into a (Seeed Studio XIAO) ESP32-S3 that I had lying around, program it using ESPHome, and handle any automations in Home Assistant.
Let’s build it.
Building It 🛠️
First Attempt
My first attempt to build my smart coaster didn’t work. In my head, I thought I could make this as compact as possible by mounting the VL53L0X sensor at a 90° angle to the coaster and hiding my ESP32 chip behind it.
 My first attempt to build the smart coaster. I later decided mounting the sensor at 90° would make the sensor too close to the bottle.
This approach was a bad idea. Because I was speedrunning this project, I didn’t take the time to read any of the specifications on the VL53L0X sensor I had just purchased online. It turns out there is a minimum distance the sensor needs to be from an object to work properly (30-40 mm).
Alternatively, I could have used a different sensor such as the VL53L4CD, with a near 0 mm minimum range. At the time of ordering my parts, it wasn’t yet supported by ESPHome. Only later did I learn that a mrtoy-me had been working on a custom component for it but it is no longer public.
If I were to mount the sensor to the board shown above, the sensor would be too close to the bottle to work properly. This might create a false reading, which could lead to a lot of incorrect notifications. 🚨
But then I had a brilliant idea. Rather than increasing the length of my coaster plate and pushing the sensor further back, what if I leaned the mounting board back at a 45° angle? 📐
Since the sensor would be further away and pointing up at an angle, this would greatly increase the distance between the sensor and the closest point on the water bottle.
Not only that, leaning the board back would shrink the overall footprint by lowering the height.
It would also make the coaster look cool. 😎
So I took a hammer and chiseled the two boards apart. 🔨 I wasn’t going to throw them away!
Second Attempt
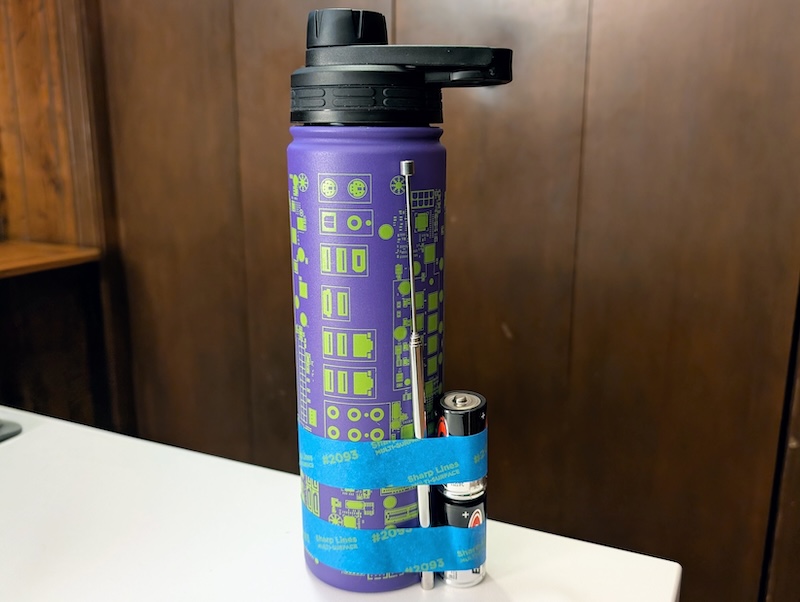
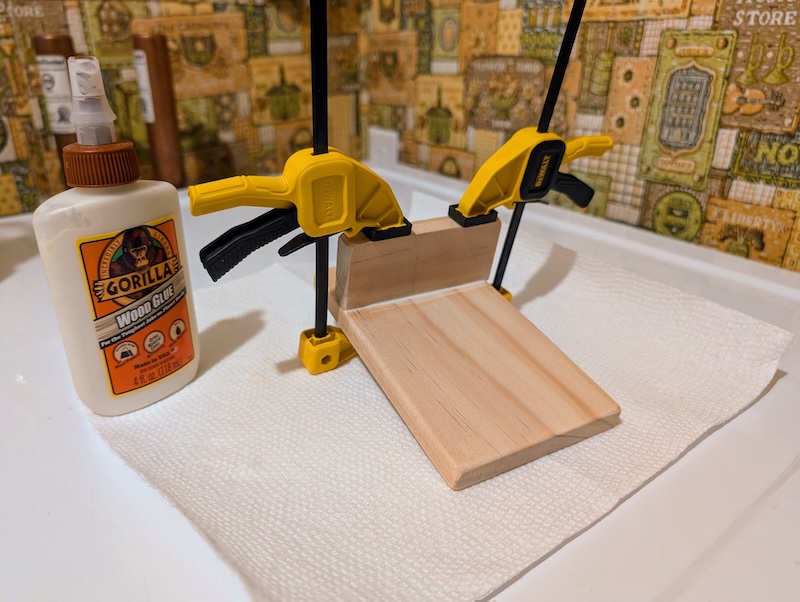
Not wanting to make the same mistake twice, I tested mounting the sensor at a new 45° angle with mounting tape (not wood glue). Funny how my arrogance got the best of me last time around. 🤦
 First assembled prototype. Instead of using wood glue, I learned from my past mistake and assembled this one with mounting tape.
And you know what? It just worked! 📽️
Let’s finish this thing.
Finishing Touches
Feeling proud of my work, I gathered my materials and tools for final assembly.
I took some wood glue and adhered the angled boards together. I found some extra screws that fit the holes in the VL53L0X sensor board and screwed it into place.
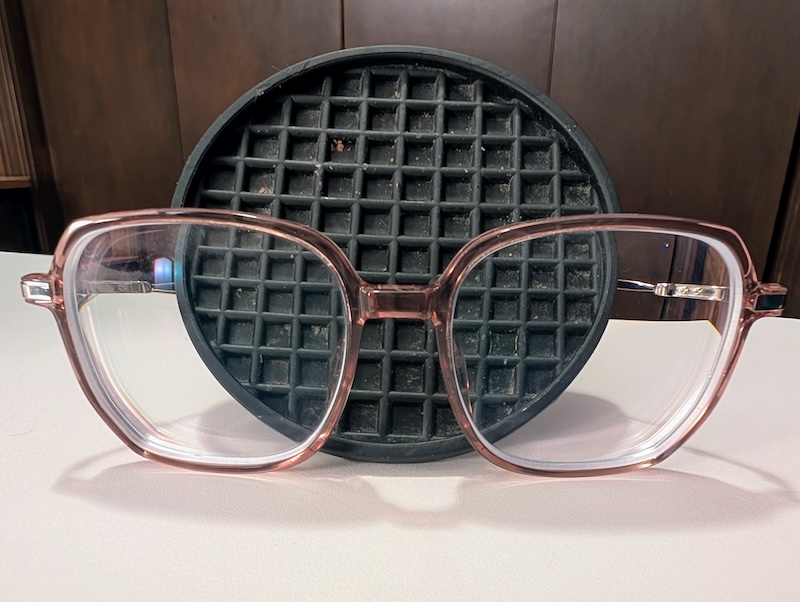
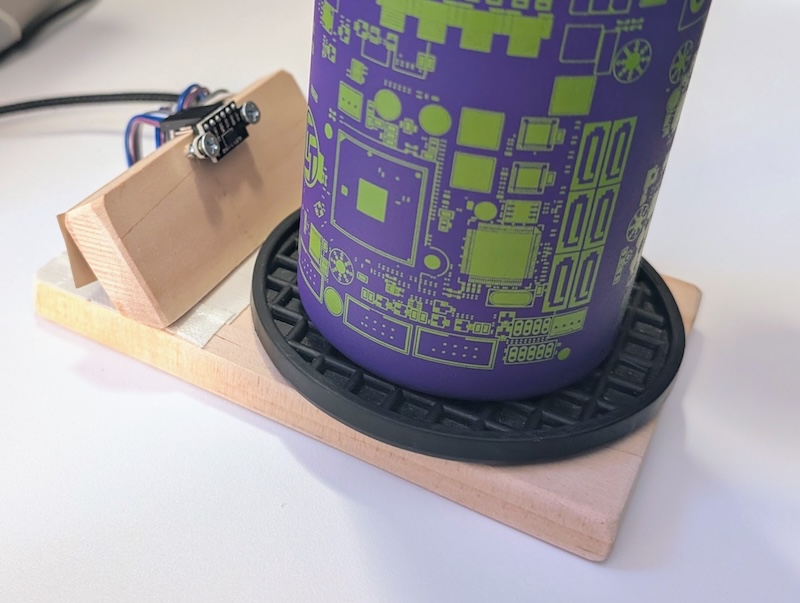
Obviously, I needed some kind of coaster to complete the coaster build. I took one of my old rubber(?) coasters and fastened it to the coaster plate with some mounting tape. 👌
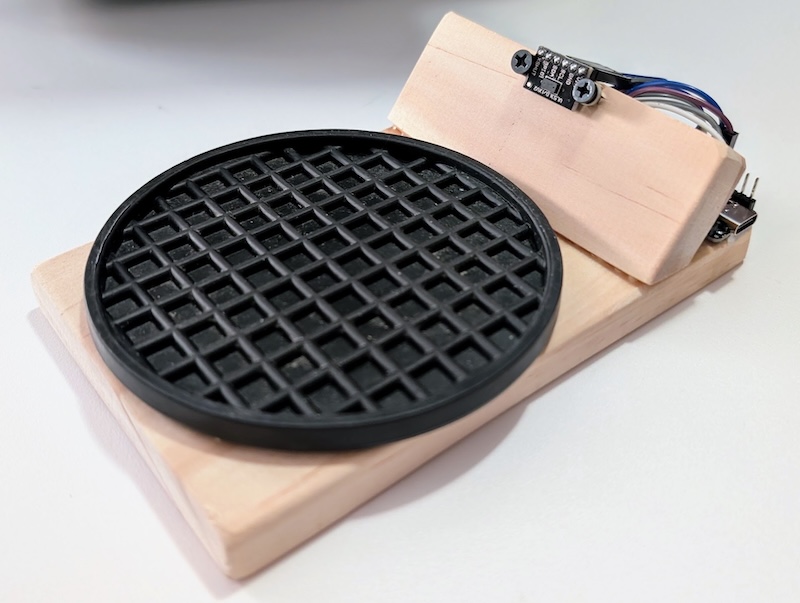 Final smart coaster from the front.
Behind the wedge in the back, I used hot glue to secure my super-compact Seeed Studio XIAO ESP32-S3 chip. Seriously, this thing is tiny.
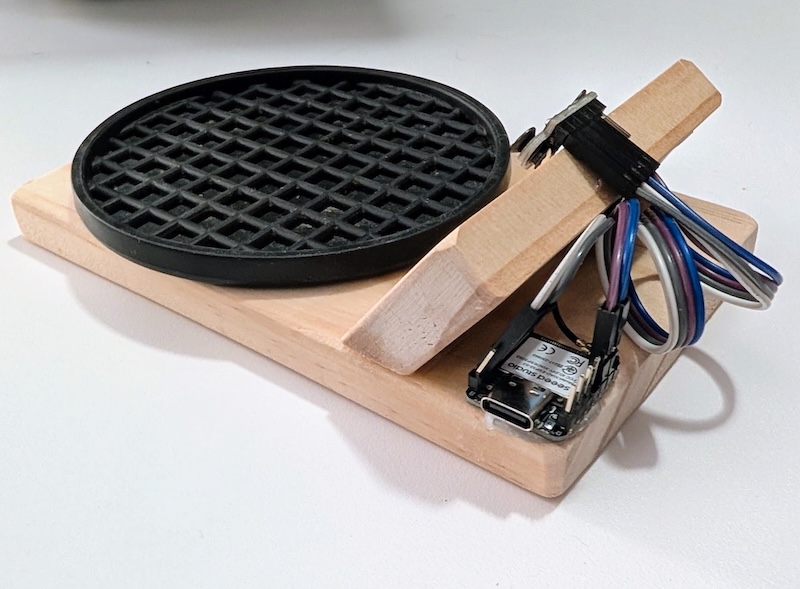 Final smart coaster with the Seeed Studio XIAO ESP32-S3 hot glued down.
Early testing revealed that I needed to figure out how to keep my smart coaster from sliding around my desk.
Last year, I encountered a material that I thought would work perfectly for my situation. I had previously purchased a watch stand from Spigen. It had an interesting material at the bottom that they named “NanoTac”. This material kept the watch stand upright on the desk and resisted being knocked over, but it wasn’t sticky.
It’s somewhat similar to those sticky hands you’d get from the quarter machines as a kid, but in a much thinner layer. It’s pretty close to what I would describe as a silicone gel pad with some light textured etching on it. But I don’t think it was actually silicone.
If you’re trying to find a similar material, I’d recommend looking for “Car Dashboard Non Slip Mat” or “Anti Slip Gel Pads” online.
After a bit of searching, I ended up finding some textured car dashboard pads that fit this description. I cut them to size and slapped them to the bottom of the coaster. They just kinda stay without any glue. The feet also dampen the sound when I set my water bottle down. It’s pretty neat!
This isn’t going anywhere! 🚫🕺
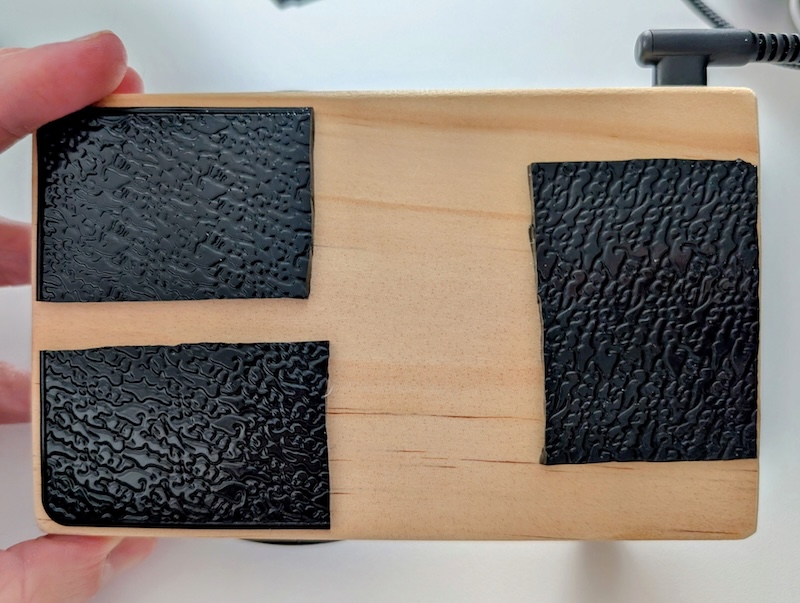 “Gel” pads installed underneath the coaster so it doesn’t slide around my desk.
Final Parts Breakdown
Here is the parts list for my smart coaster and the (approximate) cost of each item:
- Existing rubber coaster ($1)
- Scrap wood ($1)
- Seeed Studio XIAO ESP32-S3 ($8)
- VL53L0X ToF sensor ($7)
- “Gel” pads ($6)
- Screws and mounting tape ($1-$5)
- Wood glue and hot glue ($1-$5)
Total cost: $25-$33
I actually had all of these parts laying around except the VL53L0X sensor and the “gel” pads. So my actual cost was closer to $15. 🤑
Physically, the smart coaster is complete. But how does it work?
How the Smart Coaster Works 🤖
Assembling the hardware is satisfying, but the real intelligence lies in the automations that connect it all.
As I mentioned before, I’m using a VL53L0X ToF sensor to detect if a water bottle is present on the coaster. It is connected to a Seeed Studio XIAO ESP32-S3 chip, which is programmed using ESPHome. I connect the ESP32-S3 to my Home Assistant instance to handle the automations.
High-Level Rules
During my workday, if 45 minutes pass and I haven’t picked up my water bottle, I’ll receive a notification on my devices suggesting that I should take a drink. ⌛️
When I pick up the water bottle, the timer will reset back to 45 minutes, and any pre-existing drink notifications on my devices will be automatically dismissed. 🚰
After the timer ends, if I don’t pick up my water bottle, I will continue to receive notifications every 5 minutes until I pick up the water bottle. ♻️
Prerequisites
Required
- Create a timer for the desired duration between drink reminders (I use 45 minutes). This will be used in the automations.
Optional
- Create a counter that will increment every time I pick up my water bottle.
- Useful for historical tracking.
- https://www.home-assistant.io/integrations/counter/
- Create a template sensor of the counter’s state.
- Necessary to use it with the
utility_meterintegration below. {{states('counter.drink_counter')}}- https://www.home-assistant.io/integrations/template/
- Necessary to use it with the
- Create a utility meter of the template sensor above.
- Have the utility meter “reset daily”.
- Useful for tracking daily water intake.
- https://www.home-assistant.io/integrations/utility_meter/
Automation Triggers
My timer automatically kicks off during the workday (weekdays) at:
- 8:00 AM
- 1:00 PM
- Whenever my laptop screen turns on (assuming the timer is not already running). This is more of a fallback in case I’m starting later than usual.
Screen Offis an attribute exposed on thebinary_sensor.mac_device_activein the Home Assistant companion app on MacOS.
Automation Actions
If the timer runs out naturally:
- I get an alert
- The timer gets set back to 5 minutes (which will keep looping)
If I pick up the water bottle:
- The timer gets reset to 45 minutes
- Any drink notifications on my devices get automatically dismissed (thank goodness; less notification spam)
The
clear_notificationis a message that can be sent to clear Home Assistant notifications on a device that has a matchingdata.tag.https://companion.home-assistant.io/docs/notifications/notifications-basic#clearing
Notification Conditions
Notifications will only be sent if the following conditions are met:
- The timer runs out
- During normal working hours (excludes lunch hour)
- My laptop screen is on (which means I’m at my computer next to my smart coaster)
[Yaml] Home Assistant Automation
# Written for Home Assistant 2025.2.0
alias: Water Bottle Drink Timer & Alerts
description: Automation to notify me when I haven't had anything to drink for a while.
triggers:
  - trigger: event
    event_type: timer.finished
    event_data:
      entity_id: timer.water_bottle_timer
    id: timer-finished
    alias: Water bottle timer finishes
  - alias: Water bottle picked up
    trigger: state
    entity_id:
      - binary_sensor.esp_32_s3_01_water_bottle_present
    to: "off"
    id: reset-timer
    from: "on"
    for:
      hours: 0
      minutes: 0
      seconds: 1
  - trigger: time
    at: "08:00:00"
    id: start-timer
    alias: Kick Off Timer (Morning)
  - trigger: time
    at: "13:00:00"
    alias: Kick Off Timer (Afternoon)
    id: start-timer
  - trigger: state
    entity_id:
      - binary_sensor.mac_device_active
    attribute: Screen Off
    to: "false"
    from: "true"
    alias: When screen turns on (backup condition)
    id: screen-on
conditions:
  - alias: During standard working hours
    condition: time
    after: "07:55:00"
    before: "16:55:00"
    weekday:
      - mon
      - tue
      - wed
      - thu
      - fri
actions:
  - choose:
      - conditions:
          - condition: trigger
            id:
              - start-timer
          - condition: state
            entity_id: binary_sensor.esp_32_s3_01_water_bottle_present
            state: "on"
        sequence:
          # By cancelling the timer and starting it again, we can have it return to its original value at without needing to pass the duration in.
          - action: timer.cancel
            metadata: {}
            data: {}
            target:
              entity_id: timer.water_bottle_timer
          - action: timer.start
            metadata: {}
            data: {}
            target:
              entity_id: timer.water_bottle_timer
      - conditions:
          - condition: trigger
            id:
              - reset-timer
        sequence:
          # By cancelling the timer and starting it again, we can have it return to its original value at without needing to pass the duration in.
          - action: timer.cancel
            metadata: {}
            data: {}
            target:
              entity_id: timer.water_bottle_timer
          - action: timer.start
            metadata: {}
            data: {}
            target:
              entity_id: timer.water_bottle_timer
          - parallel:
              - action: counter.increment
                metadata: {}
                data: {}
                target:
                  entity_id: counter.drink_counter
              - data:
                  message: clear_notification
                  data:
                    tag: water-drink-alert
                action: notify.kyle
                alias: Clear notify.kyle
      - conditions:
          - condition: trigger
            id:
              - timer-finished
          - condition: not
            conditions:
              - condition: time
                after: "11:55:00"
                before: "13:05:00"
            alias: Not during lunch
          - alias: Mac screen on
            condition: state
            entity_id: binary_sensor.mac_device_active
            attribute: Screen Off
            state: false
        sequence:
          - parallel:
              - data:
                  # My cheater way to convert the timer's original duration into minutes for my notification. It will work for any _sane_ duration.
                  title: 🥤 Drink some water
                  message: >-
                    You haven't had anything to drink in the last {% set
                    remaining_time = state_attr('timer.water_bottle_timer',
                    'duration').split(':') %}{{remaining_time[0] | int * 60 +
                    remaining_time[1] | int }} minutes.
                  data:
                    ttl: 0
                    priority: high
                  data:
                    notification_icon: mdi:beer
                    group: water-drink-alert
                    channel: water-drink-alert
                    tag: water-drink-alert
                    push:
                      interruption-level: time-sensitive
                action: notify.kyle
              - action: timer.start
                metadata: {}
                data:
                  duration: "00:05:00"
                target:
                  entity_id: timer.water_bottle_timer
                alias: Short timer restart (reminder)
      - conditions:
          - condition: trigger
            id:
              - screen-on
          - condition: not
            conditions:
              - condition: state
                entity_id: timer.water_bottle_timer
                state: active
            alias: If timer not running
        sequence:
          # By cancelling the timer and starting it again, we can have it return to its original value at without needing to pass the duration in.
          - action: timer.cancel
            metadata: {}
            data: {}
            target:
              entity_id: timer.water_bottle_timer
          - action: timer.start
            metadata: {}
            data: {}
            target:
              entity_id: timer.water_bottle_timer
mode: single
ESPHome Configuration
Here is a breakdown of the hardware and ESPHome configuration I used for my smart coaster:
- Board:
- Seeed Studio XIAO ESP32-S3
- Super small form factor
- (I have a few lying around from Christmas 🎄)
- Seeed Studio XIAO ESP32-S3
- Sensor:
- VL53L0X ToF sensor to detect the presence of a water bottle on the coaster
- Super compact
- Easy to find online
- The component already exists in ESPHome
- VL53L0X ToF sensor to detect the presence of a water bottle on the coaster
[Yaml] ESPHome Configuration
# Basic Config
# esp-32-s3-01
# Smart Coaster
# Update for 2025.5.0

substitutions:
  board_id: esp-32-s3-01
  friendly_name: Smart Coaster
  name: smart-coaster

wifi:
  ssid: !secret wifi_ssid
  password: !secret wifi_password

  # Enable fallback hotspot (captive portal) in case wifi connection fails
  ap:
    ssid: "${board_id} Hotspot"
    password: !secret ap_hotspot_password

# Enable captive portal if wifi ever changes
captive_portal:

# Enable Home Assistant API
api:
  encryption:
    key: !secret encryption_pre_shared_key

ota:
  platform: esphome
  password: !secret ota_password

esphome:
  name: ${name}
  comment: ${board_id}
  friendly_name: ${friendly_name}

esp32:
  board: esp32-s3-devkitc-1
  framework:
    type: arduino

# Enable logging
logger:

i2c:
  id: bus_a
  sda: GPIO05
  scl: GPIO06
  scan: true

sensor:
  - platform: vl53l0x
    id: vl53l0x_sensor
    name: "VL53L0x Distance"
    update_interval: 500ms
    unit_of_measurement: "mm"
    filters:
      - multiply: 1000

binary_sensor:
  - platform: template
    name: "Water Bottle Present"
    lambda: |-
      if (id(vl53l0x_sensor).has_state()) {
        // 150 mm threshold
        return id(vl53l0x_sensor).state < 150;
      } else {
         // Return false if the sensor has no state yet
        return false;
      }
    device_class: occupancy

# Enables status LED
status_led:
  pin:
    number: GPIO21
    inverted: true
What Would I Do Differently?
If I had the gumption and endless free time for this project, I would:
- Use a dark walnut wood stain on the coaster plate
- Carve out a small channel or hole in the coaster plate to hide the sensor wiring
- Figure out how to recess the sensor to the coaster plate
- Cover the sensor with a thin layer of acrylic to better hide and protect it
- Solder wires between the boards
- Enclose the back wedge with a thin layer of wood or black acrylic
Update: 2025-06-17
I’ve been using my smart coaster for a few months, and it’s made me more conscious about my water intake. So far I’ve received ~700+ drink reminders, or around 9 each day.
As this has become one of my most consistently used devices, I decided to treat myself and tackle some items from the wishlist I posted a few months back.
- ✅ Use a dark walnut wood stain on the coaster plate
- ✅ Carve out a small channel or hole in the coaster plate to hide the sensor wiring
- ✅ Figure out how to recess the sensor to the coaster plate
- ✅ Cover the sensor with a thin layer of acrylic to better hide and protect it
- ✅ Solder wires between the boards
- ❌
Enclose the back wedge with a thin layer of wood or black acrylicWith organized wiring, this should be unnecessary
First Attempt
I figured this would be a straightforward update. I would take some of my new tools and create an updated version of my coaster plate that addresses the aesthetic complaints I had with the first version.
To get things started, I needed some design ideas. I wanted to match some of the mid-century modern elements that are already present in my home. After toying around with some thoughts, I enlisted Gemini to help me envision some different color changes in my original coaster.
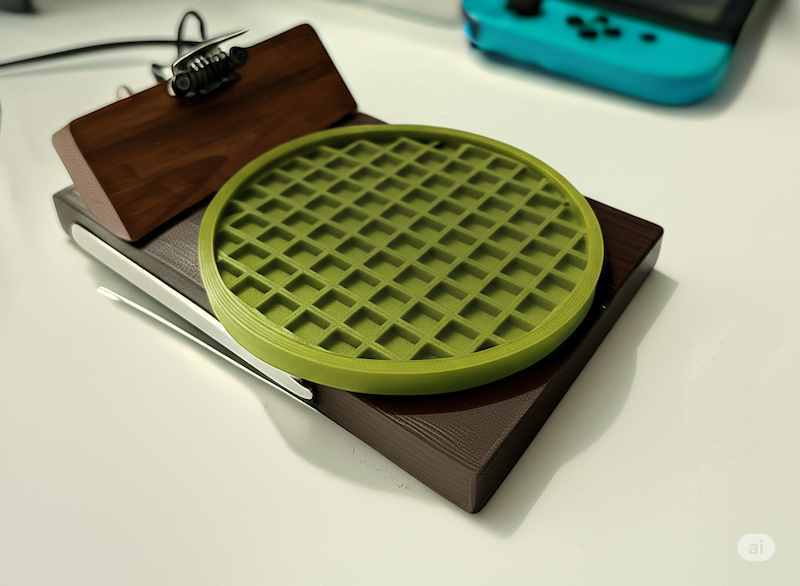 Gemini AI’s re-imagining of my original coaster with a dark walnut stain and a green coaster pad
The above image is what inspired me to mix a dark walnut wood stain with some green elements. To complement the dark wood, I eventually decided on a dark sage green silicone pad and braided USB-C cable. I ordered the parts and went to work forming the wooden base.
The first thing I did was gather the pine wood that I used for the original coaster plate. I cut it down to size and added some blinders in the back to hide the electronics from the side. I glued it all together and let it dry overnight.
If I owned (or knew how to use) a CNC router, I would have used it to:
- Carve out the recessed hole for the ToF sensor
- Cut a shallow recess to inlay an acrylic plate cover
But I didn’t have those tools. So I pulled out my handheld rotary tool and carved out the recessed hole for the ToF sensor with my carving bits. My goal was to make the sensor flush-mounted to the coaster backing. This would make it easier to hide.
 My Smart Coaster V2 in (eastern white?) pine before staining
Hiding the Sensor
Reminder: My ToF sensor needs to be able to see the laser dot reflection to measure the distance from an object. So whatever material I use to hide it needs to possess some kind of transparent properties.
My original plan was to adhere a super thin, black, translucent acrylic sheet over the sensor. I wasn’t able to locate any, so I did the next best thing. I decided to use some “LED dimming stickers”. LED dimming stickers are sold as devices that can help dim blindingly bright electronic LEDs that illuminate a room at night.
You can easily find these magical stickers online, but they’re essentially glossy, thin plastic stickers that block some amount of light from shining through. The best way to describe this is like a black-tinted Kapton tape.
Through some early testing, I found that covering my ToF sensor with one of these stickers successfully hides the sensor while still allowing the laser light to still detect distances. ✅
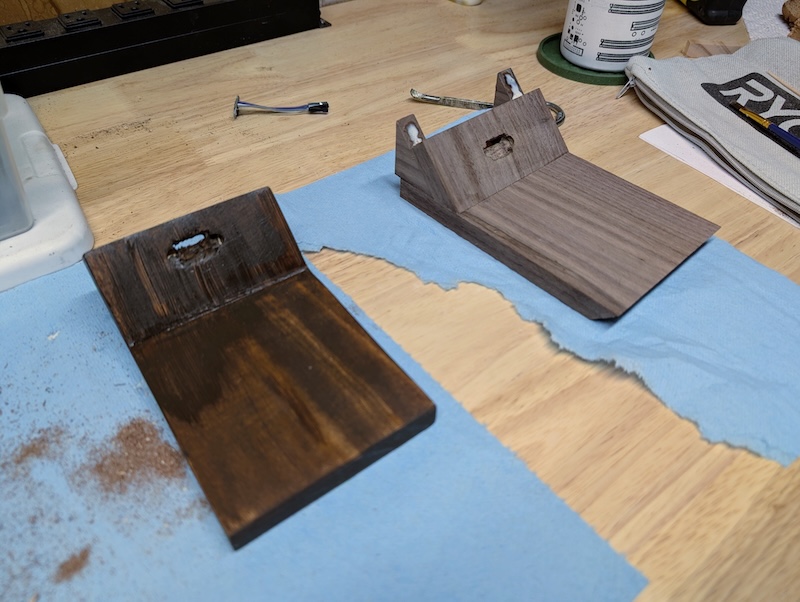
With the plan in motion, I switched back to the coaster board. I sanded down the dry prototype and began to apply a dark walnut wood stain.
 My Smart Coaster V2 after a terrible staining job with super inconsistent grain
The results looked beautiful like trash 🗑️. Seriously, this was a disaster. I’ve done some passable wood staining in the past for trim, railings, and speakers. I’ve even used the exact same wood stain when I refinished the top on my Sansui SP-1700 speaker below!
 Proof that I’m not entirely incompetent by demonstrating the same stain gel to repair and re-finish my Sansui SP-1700 3-Way Speaker
After 3 coats, the stain was still uneven and blotchy from the cheap pine board I was using. Instead of trying to fix the problem, I made the decision to use a superior material.
Second Attempt
Enter black walnut. If I was trying to get a “dark walnut” look for my coaster, why not just use black walnut? In quantities this small, it doesn’t really hurt the bank too much. 💰
I found some solid 1/2” black walnut ‘thin stock’ that fit the dimensions I needed and ordered it. Oh wow, let me tell you, this stuff is gorgeous. You can find some really nice grain patterns in the wood, especially when it’s wet.
I took this opportunity to add an additional angled front undercut that is parallel to the slant on the rear of the back wedge. I think it gives the coaster a nice, subtle flow with something less boring.
Since everything was still in pieces, I also carved out a channel in the back wedge where I planned to hide the ToF sensor and wiring. You can see my test fitment below.
 Preparing the surfaces of the black walnut coaster with painter’s tape to keep the glue from spreading on the wood
Learning from some mistakes on my previous prototype, I wrapped the edges of my coaster with some green painter’s tape so the wood glue wouldn’t squeeze out everywhere. I made sure to remove these after pressing the pieces together and before the glue dried so they wouldn’t get stuck underneath any edges. I theorize this was one of my issues in my earlier prototype, where the stain was unable to penetrate the pine wood properly due to the glue soaking into the wood.
 A comparison showing the abomination of my stained V2 coaster versus my un-oiled V3 coaster
After the glue dried, I sliced off the back ears and sanded it down with some 220-grit sandpaper to hide my miter saw cuts. Once everything was smooth, I began to apply the finish.
Applying the Finish
Since this is already a dark wood, I chose not to stain it, or else I might lose some of the lighter grain definition. I went with Osmo Polyx Hard Wax Oil #3054 (Clear Satin) to give it a nice sheen. It was very easy to work with. After 2 coats, this was the result. 😳
 The beautiful sheen of my black walnut coaster plate after rubbing in Osmo Polyx Hard Wax Oil #3054
It looks so good! I really wish I had used a nicer wood like this from the start. But using pine in the earlier prototypes gave me plenty of opportunities to refine my design.
After a bit of drying time, I added the gel pads to the bottom of the coaster (reusing the same ones as before). I inserted the newly soldered ToF sensor and routed the wires into the back pocket, where they connected to Seeed Studio XIAO ESP32-S3. I hot-glued the ESP32-S3 into place and made sure everything was working properly.
 The backside of my Smart Coaster showing the compact install of the Seeed Studio XIAO ESP32-S3
Here is another view of the nearly completed Smart Coaster V3 from the front. At this point, everything was functional again. But I needed to take care of some finishing touches before I could call it complete.
 The nearly complete Smart Coaster V3 with its recessed time-of-flight sensor still exposed
Learning About Silicone
I had to stop my coaster pad from sliding off of the wooden base plate. The reason I’m using a coaster pad is that it helps guide the placement of the water bottle without looking. If I didn’t have this, I might accidentally set my water bottle down on the edge of the coaster plate where it could tip over.
To mount the silicone coaster pad to my wooden base, I tried to use some of the same mounting tape I used in my original prototype (which I later learned was rubber). That didn’t work well. The tape was actually sticking to the paper backing better than it was to the silicone coaster pad. 🙃
Next, I tried to hot glue it. If you’ve worked with silicone before, you can probably guess how that went. The hot glue blobs peeled right off of the silicone pad. 🥸
Those lessons gave me hands-on learning on how silicone is extremely hydrophobic and non-porous. To adhere silicone to anything, one needs to choose more appropriate alternatives like a silicone-based adhesive.
Lucky for me, I already had some lying around. I ended up using some Permatex 81158 Black Silicone Adhesive Sealant from the depths of my tool shelves. So far it’s holding! 🤞
Playing With Stickers
To wrap up the coaster rebuild, I had to cover the ToF sensor. Putting a cover over it protects the sensor from dust and debris while also hiding any electronics that might be visible from view.
Inspired by mid-century atomic design, I wanted to overlay a stretched black diamond accent piece. My goal was to match the design language that I was already applying in the wood angles. Using my X-Acto knife, I sliced away a diamond-shaped accent from the blank sticker sheet and placed it over the sensor.
 Sticker placement covering the ToF sensor on my Smart Coaster V3 (ignore the pencil alignment marks ✏️)
If my sticker gets damaged over time, I could always switch to using one of the pre-cut strips in a horizontal line for a greater contrast. But I think the diamond shape looks better.
And we made it. Here’s the final (for now) result of my Smart Coast V3! ✨
The final Smart Coaster V3 made from black walnut and a hidden time-of-flight sensor behind the black translucent sticker
Conclusion
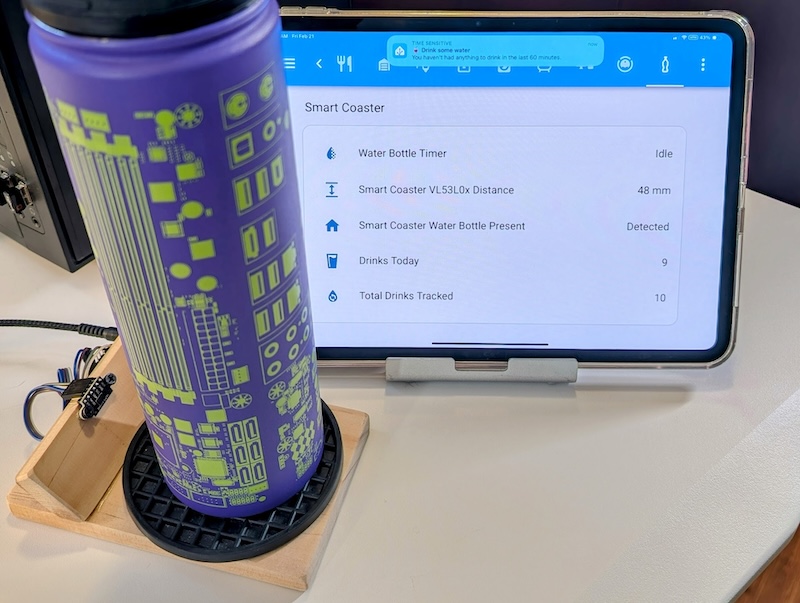 Smart Coaster V1 with its data being displayed on my Home Assistant dashboard as a notification nudges me to drink water
I want to make sure I remember to drink water. I think I’ve figured out a good approach that avoids any feedback loop from tracking and interacting with my phone. I think my solution reduces any additional cognitive load by only nudging me when appropriate and automatically dismissing all notifications when I pick up my water bottle.
From conception to completion, this project only took 2 days—a record for me. 🏃
The final result is a smart coaster that is delicately reminding me to drink water and staying out of my way if I drink water naturally.
All of this to say, my temporary prototype solution is good enough to be permanent¹. 🥤🖖
¹Until I decided to build a better looking one months later. 😅