Achieving Remote Starter Serenity
Kyle Niewiada on December 01, 2019
19 Minute Read | Large project
Updated on August 05, 2022
Modern cars are like expensive computers with an engine and wheels. Any car from the last decade has loads of electronic systems that rely on special computers to operate. My 2009 Subaru Impreza is no exception. If I want to improve my experience with that computer, I need to locate the correct wiring diagrams and software to speak with it. Making any modification to the wiring in my vehicle requires confidence.
Since cars have over a thousand wires, and I’m not confident on modifications made to my car, I’ve installed an automotive fire extinguisher. This is the saga of achieving serenity with my remote starter.
Table of Contents
Uncomfortable Car Climate
I am in the unfortunate position where my car lives outside without any shelter from the punishing temperatures. In the summertime, my car bakes in the sunlight. In the winter, ice glazes over the windows. My car comes from the time period where clunky touch screens were starting to take over vehicle dashboards, Bluetooth was a rising option, and tape decks were no longer included.
My 2009 Subaru Impreza was born in the middle of this awkward time. It didn’t have the optional remote starter, no in-car phone calling, nor did it include a fancy satellite radio setup. Nope– it was a normal car lacking any subscription services. This was fine news for me though. Now I wouldn’t need to fight DRM to the death in my duel to improve my experience.
To make seasonal living with my Subaru more tolerable, I began looking into remote starter options. I wanted a single button press to create the ideal micro-environment for my commute to work and back. No more would I spend time scraping ice off my windows each winter morning.
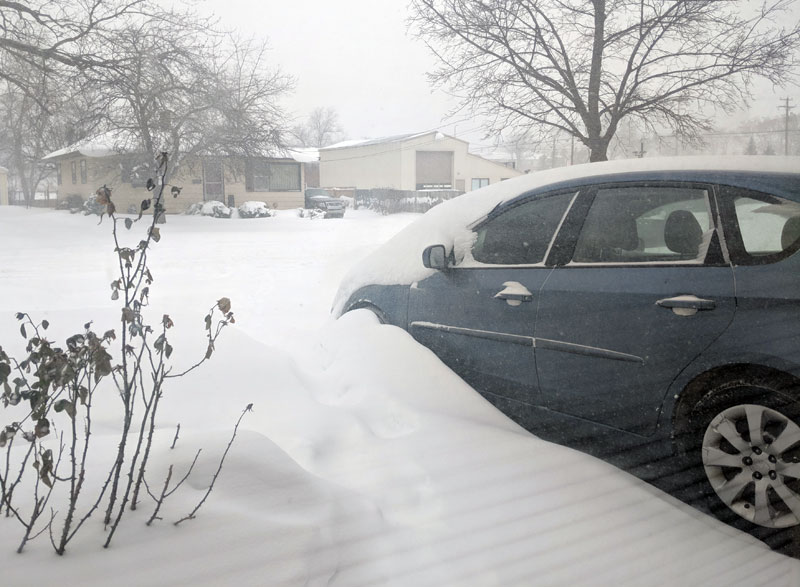 My car exposed to the wicked weather
My Quest for a Remote Starter
Asking the Dealership
The first step I took in installing a remote starter in my vehicle was contacting the local Subaru dealership. I wanted to see if they could install a factory remote starter in my vehicle I had read about before. Here’s what they said:
“Subaru did offer a remote starter for your vehicle at one time. Unfortunately, that remote starter accessory kit has been discontinued, and not replaced. You would have to contact an aftermarket supplier.”
The Aftermarket Supplier
After searching around the local auto shops, I found an affordable one that would be able to install a remote starter. The local shop was a little bit different though. They took no appointments for their work; it was a first come, first served model. It seems like they had enough demand to warrant this. If you wanted your remote starter installed that day, you needed to arrive long before they opened to get a spot in line– especially later in the fall season.
Lacking affordable options, I did just that. I dragged my wife along with me to the special auto shop about 30 minutes before they opened. I found myself fourth in line. Not terrible; not great.
Once they opened, we all shuffled out of the cold weather into the small shop. When it was my turn at the counter, I showed them which remote starter system I was looking to buy. They showed me which bypass system I would need in order to make the remote starter work with my vehicle. I reluctantly agreed to the purchase and they queued me up for the install.
After six hours of waiting and walking around the neighborhood, they wrapped up the installation. The tech came out to the waiting room and turned over my keys. In a hurry, they showed me what button would lock and unlock my car, and then which button I need to press for the remote starter.
Remote Starter Results
What I Learned
- The shop didn’t take the time to polish any of the settings.
- Only authorized dealers or installers have access to the programming and installation documents for the remote starter and bypass modules.
- I don’t like the secrecy behind the products in the remote starter industry.
Expected: The remote starter is installed and configured in a way that isn’t a nuisance.
Actual: The auto shop wired up the car so a button could turn it on and off. No extra features or convenience programming. No questioning the customer on what they would like set up.
What Was Neglected
- The car’s default alarm will chirp alongside the aftermarket remote starter system whenever locking/unlocking. This lets everyone know that the car is twice as secure.
- The car requires the user to press the unlock button twice on the new remote with frame-perfect timing in order to unlock all doors. Since there is a long delay with the new remote, this makes it difficult. If the user isn’t fast enough, it will only unlock the driver door.
- The remote starter doesn’t turn on the rear defogger because no one thought I would care about that.
I made a deep dive into researching what I had just purchased and how I could fix my problems. I found out that both my remote starter and bypass module had installation manuals, but these manuals were only available to dealers of their products.
Fixing the Neglected
Disabling the Double Alarms
The car’s default alarm will chirp alongside the aftermarket remote starter system whenever locking/unlocking. This lets everyone know that the car is twice as secure.
This one was a super simple Google search away. All I had to do was:
- Sit in the driver seat.
- Press and hold the unlock button on the driver side door.
- Within 10 seconds insert and remove the key from the ignition six times.
- While still holding the unlock button, open and close the driver’s door.
- That’s it. The hazard lights should flash confirming the change.
I’m not sure why I couldn’t figure this one out on my own /s. The quality of life with my remote starter was improving.
Solved
Sending a Double Unlock Pulse With the New Remote
The car requires the user to press the unlock button twice on the new remote with frame-perfect timing in order to unlock all doors. Since there is a long delay with the new remote, this makes it difficult. If the user isn’t fast enough, it will only unlock the driver door.
This is where things start getting trickier. I own the remote starter system. So surely, I would have the right to reprogram it myself. Right?
The manufacturer doesn’t believe so. In fact, they’ve hidden away their installation manual and made it only available to partnered installers.
Following the trend of my last problem, the installation manual to the remote starter was easy to find. A quick search later I had the full installation manual to my remote starter system. Reading through the documentation I made a new discovery. It was full of programming options. Some of them required a (proprietary?) bit writer, but most of the options could be programmed with a stupid amount of chirping and beeping.
Remember the steps that I needed to follow to disable the lock/unlock beep of my car? The remote starter programming takes that to a whole new level if the user doesn’t own the proprietary bit writer.
Let’s break down the steps that I needed to follow to have my remote starter send a double pulse to unlock my vehicle.
Remote Starter Programming
The installation manual breaks down programming the remote starter into these concepts.
- There are multiple
pages of menusin the vehicle configuration. - Each
menu pagecontains severalmenu itemsthat can be reprogrammed. - Each
menu itemcontains severaloptionsto choose between.
In order to change an option, I must navigate to the correct menu page, navigate to the correct menu item, and finally cycle through the options.
To change the unlock pulse behavior of my remote starter, it looks something like this:
- Open the passenger door.
- Turn the ignition on then off.
- Press and hold the programming button in the vehicle until the vehicle chirps 3 times.
- Release the button (You’re now in
Menu Page 3). - Press and hold the programming button in the vehicle until the vehicle chirps 7 times.
- Release the button (You’re now in
Menu Item 7). - Press and hold the programming button in the vehicle to begin modifying the value.
- Press and release the unlock button on the remote to switch the value in
Menu Item 7toOption 2. - Release the programming button in the vehicle to finish modifying the value.
- The vehicle will chirp twice (to verify the selection of
Option 2). - Shut the passenger door to exit programming mode and the vehicle will chirp once again.
Those were the steps I needed to follow in order to change the remote unlock feature on my remote starter to send a double pulse. So yea, another easy task for us consumers /s.
As a bonus, the whole neighborhood gets to hear these lovely chirps/alarms while stumbling through the menus. Make sure you’re on good standings with your neighbors before violating their ears with repeated chirping.
Solved
Enabling the Rear Defogger in Cold Weather
The remote starter doesn’t turn on the rear defogger because no one thought I would care about that.
This is the complicated feature which took the bulk of my time on this project. While digging through the installation manual of my remote starter, I discovered that it contained functionality to enable a defogger system when it was below a certain temperature in the vehicle. I wanted this feature.
Quite often I would turn on my car in the winter and it would not get warm enough to melt the ice on my back window. What’s the point of a remote starter if it doesn’t get warm enough to make my car easier to scrape off?
I pulled apart the ignition wiring in my vehicle to inspect the work completed by the auto shop. I noticed that they had already attached the remote starter blue/white striped defogger wire to something in my ignition system. I assumed that since that wire was hooked up, I was good to go.
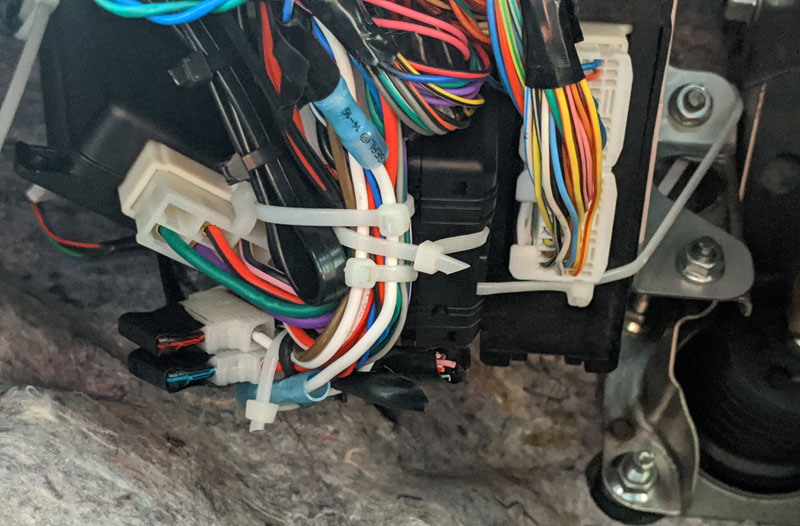 Remote starter hooked up to my Subaru
I went through the complicated programming menu (demonstrated earlier) and changed the behavior of the defogger wire to trigger when starting the car.
But when I tried to start my car through the remote starter, nothing happened. The car clicked a few times and then stopped. Upon further investigation, it turns out the auto shop didn’t connect the wiring harness for the rear defogger but instead hooked up the remote start activation incorrectly.
A Poorly Written Manual
Below is a table showing the wiring harness connector codes for my remote starter. If you look closely at Wire 2 (Rear Defogger) and Wire 11 (Remote starter activation) you will notice something interesting.
The color codes are basically the same.
Wire 2 = Blue/White
Wire 11 = White/Blue
Why???
| Wire | Color Code | Description |
|---|---|---|
| 1 | PNK/WHITE | (-) 200mA IGNITION 2/ACCESSORY OUTPUT |
| 2 | BLUE/WHITE | (-) 200mA 2ND STATUS /REAR DEFOGGER OUTPUT |
| 3 | RED/WHITE | (-) 200mA TRUNK RELEASE OUTPUT |
| 4 | BLACK/YELLOW | (-) 200mA DOME LIGHT OUTPUT |
| 5 | DARK BLUE | (-) 200mA STATUS OUTPUT |
| 6 | WHITE/BLACK | (-) 200mA AUX 5 OUTPUT |
| 7 | WHITE/VIOLET | (-) 200mA 2nd UNLOCK OUTPUT |
| 8 | ORANGE/BLACK | (-) 200mA AUX 6 OUTPUT |
| 9 | GRAY | (-) HOOD PIN INPUT |
| 10 | BLUE | (-) TRUNK PIN/INSTANT TRIGGER INPUT |
| 11 | WHITE/BLUE | (-) REMOTE START ACTIVATION INPUT |
| 12 | VIOLET/WHITE | TACHOMETER INPUT |
| 13 | BLACK/WHITE | (-) PARKING BRAKE INPUT/EMERGENCY INPUT |
| 14 | GREEN/BLACK | (-) 200mA FACTORY ALARM DISARM OUTPUT |
| 15 | GREEN | (-) DOOR INPUT |
| 16 | BROWN/BLACK | (-) 200mA HORN HONK OUTPUT |
| 17 | PINK | (-) 200mA IGNITION 1 OUTPUT |
| 18 | VIOLET | (+) DOOR INPUT |
| 19 | VIOLET/BLACK | (-) 200mA AUX 4 OUTPUT |
| 20 | BROWN | (+) BRAKE SHUTDOWN INPUT |
| 21 | VIOLET/YELLOW | (-) 200mA STARTER OUTPUT |
| 22 | GRAY/BLACK | (-) DIESEL WTS (WAIT-TO-START) INPUT |
| 23 | ORANGE | (-) 200mA ACCESSORY OUTPUT |
| 24 | GREEN/WHITE | (-) 200mA FACTORY ALARM ARM OUTPUT |
Guess how the auto shop hooked up my vehicle? That’s right. The installation technician didn’t count the wire pinout and instead relied on the awful color coding.
This meant that by chance my rear defogger wire was the one currently initiating my vehicle startup. When I had reprogrammed the behavior of defogger wire earlier, I was instead changing the starter activation behavior (since the defogger wire was hooked up to it instead).
After discovering the mistake made by the installation tech, I swapped the remote starter activation and rear defogger wires to their correct specification. But now I had and dangling rear defogger wire with no idea where it needed to be connected to.
Where to Run the Defogger Wire
Feeling like I was out of my league, I made a call to the auto shop to ask if they knew what to do. The auto shop said they would probably need to install custom relay and charge $50 for the installation.
Just like last time, they said it would be first come, first served. I was far from thrilled to do business with them since they had already made a wiring mistake, and never made any effort to discuss the extra convenience features with me.
I followed up with a phone call to Best Buy as they were also listed as an authorized installer for my remote starter. But Best Buy didn’t want to touch my car after they learned that the other auto shop installed my system.
My next idea was that maybe I could create this custom relay myself. I thought at first that I could run the remote starter defogger wire straight to the rear defogger button in my dashboard. I tore apart my center console and exposed the PCB to the button.
I imagined that I could simply connect to the ground on the physical switch in order to mimic a button press. Unfortunately, without building my own relay, sourcing a ground, and creating a protoboard (to change the current), I quickly realized this wouldn’t work. It was possible, but likely a last resort option.
The Bypass Module
One of the components that the auto shop installed in my vehicle was a bypass module. A bypass module allows the remote starter to operate while making the vehicle computers believe there is a key in the ignition.
I came across a few forum posts that discussed the possibility exposing extra features through a bypass module. Such features included controlling the heated seats, climate control, and starting the defogger system. I figured now was the time to investigate whether this was possible with my set up. If it was possible, then the installation was about to get a lot easier.
Just like my remote starter, the bypass module installation documentation was hidden behind another pay walled website.
Even worse, each trim level of each vehicle model for each firmware release had its own unique installation documentation. That meant if I got my hands on the installation documentation for my specific bypass module, it was almost guaranteed to be for the wrong vehicle. Good grief.
Successfully Failing
As expected, my searches came up empty when I tried to find bypass module documentation for my vehicle. What I did find was that I was a very small handful of PDF documents from Google searches that came from the manufacturer’s website. Unusually, it did not require me to be logged in to view the indexed PDF manuals.
I took that idea and ran with it. If I could figure out how the URL was being generated for each PDF manual, I should be able to access the correct manual on their website without ever needing to login.
I went back to the download page for the bypass module documentation on my vehicle. I was trying to scrape together information such as firmware revision, release dates, and vehicle codes so I could rebuild the URL for my PDF manual.
It was then where I uncovered my best luck yet. I noticed on the webpage that if I attempted to initiate the download of the manual without being logged in, it would redirect me to a login page. But in that process, it would pass along a URL parameter that contained the exact path to the final PDF destination.
Example:
https://fake-bypass-module.example.com/login?ReturnUrl=https%3A%2F%2Fblobs.example.com%2F1234%2F11.349%2FSubaru-Model-v1.pdf
I extracted the PDF URL, decoded the HTML formatting, and was able to successfully download the installation manual to my bypass module.
Success?
I read through the manual and to my dismay learned that my bypass module did not contain any programming for a rear defogger. After all of that hard work, I was back to square one.
After this project was over, I contacted the company through a number of channels inquiring if they had a bug bounty program to disclose their vulnerability. But they never got back to me… so… ok then. To each their own.
Reaching Out to Experts
After poring through different Subaru forums trying to piece together how individuals connected their own rear defogger to a remote starter, another solution was presented. I learned that most Subaru vehicles had a wire in their BCM (Body Control Module) that could trigger the rear defogger. Since I had already identified a rear defogger trigger wire in my remote starter system, this sounded like something that might work for me! But how could I confidently identify which wire I needed to connect? Not on my own, that’s for sure.
Investigating the BCMs under the steering wheel in my vehicle revealed clusters of wires emerging from various grey modules. Since I was unable to confidently identify which wire controlled the rear defogger gate, I turned to the Internet communities for help.
I stumbled upon a website called The 12 Volt. It’s a community of members trying to help others with correct and safe wiring on different equipment.
After spending some time looking through different wire schematics, I believed I had found the information I was looking for. I created a community post to confirm my findings. After some validation from another community member, I went to work back in my car.
Fun fact: Without the correct tools, I had no easy way of validating my work unless it was below 55° inside the vehicle. If it were warmer than that, the circuit enabling the rear defogger would not trigger. Essentially, I was forced to perform this work in the cold.
I cut into the wire BCM GREY 35 PIN CONN, PIN 16 under my steering column and spliced in the BLUE/WHITE wire from my remote starter. Pinching all the wires together with my cold fingertips, I hit the remote starter button. Just like magic, the car started up. Moments later the orange light indicator for the rear defogger illuminated. Success.
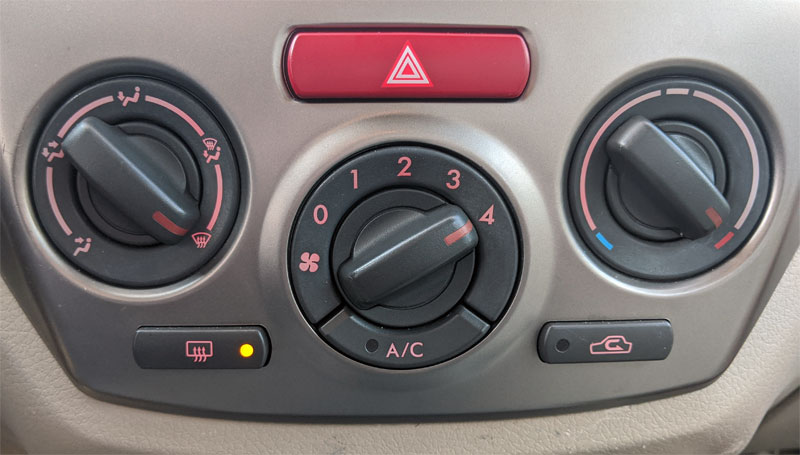
Subaru interior climate controls with the rear defogger active
Under cold weather conditions, my remote starter would now trigger the rear defogger in my vehicle allowing ice to melt off in the winter.
Solved
Recap
Here’s a quick recap of everything I fixed with my remote starter installation.
- The car’s default alarm no longer chirps in addition to the remote starter when I lock/unlock the vehicle.
- I’m no longer required to have frame-perfect timing on the remote in order to unlock all of the car doors.
- When it’s cold outside, my remote starter will automatically turn on the rear defogger to begin melting any potential ice/defog the window.
- I’ve equipped an automotive fire extinguisher for safety.
Takeaways
- The remote starter industry loves to hide all their manuals behind paywalls.
White/BlueandBlue/Whitewires are easy to mix up.- Cold temperature triggers are annoying because they require work to be completed while it’s cold.
- Fire extinguishers make you feel better when you lack confidence with the wiring job.
Final Thoughts
This project lasted for over a year. It began merely a week after I had my remote starter installed. But since I couldn’t determine why the rear defogger wasn’t working (and instead disabling my car), I shelved the project.
It wasn’t until my second year with the remote starter that I decided to conquer this issue (only to learn two of the wires had been installed incorrectly).
Because of this whole ordeal, I lacked confidence with job completed by the auto shop (and my own follow-up wiring). Their attention to detail was far from ideal. To put my mind at ease, I decided to purchase an automotive fire extinguisher. It is now happily installed on the rails behind the passenger seat in my vehicle.
If one day you’re riding with me in the car, you hop into the passenger seat, and it doesn’t adjust as far back as far as you’d like– you’ll know why.
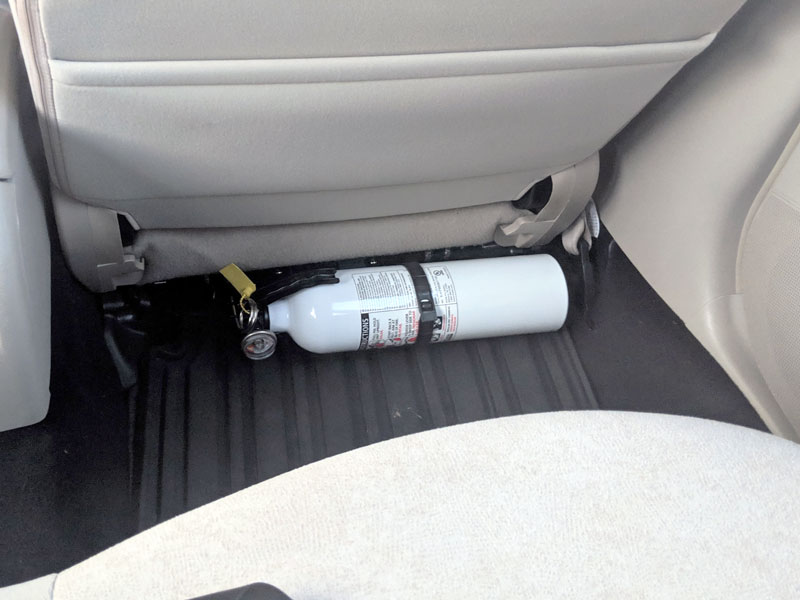 Automotive fire extinguisher installed for safety