Improving Jekyll in 2017
Kyle Niewiada on February 22, 2017
14 Minute Read | Large project
When I took a look at my website last year, it needed help. There wasn’t a whole lot wrong, but there definitely were areas that needed improvement. For starters, I wasn’t testing anything (don’t judge me). How would I test things? By overkilling the project and setting up Travis-CI of course.
Next, my website felt a little bulky. The CSS was over-the-top, I didn’t need a JavaScript header menu, I had unnecessary nested HTML tags, and still didn’t like how some of the elements collapsed on mobile devices.
The last major change that I wanted to implement was AMP (accelerated mobile pages) to make is easier for mobile devices hitting my blog. This led down a rabbit hole of further changes.
Link to the website source code right before this blog post was released; but it may be helpful to check out later revisions of code to see how things have changed.
Table of Contents
Testing
My website needed testing. I had no excuse. With every new feature added, there was another chance that something would slip by and ruin my production release. After adding AMP, I would manually validate each page in Google Chrome using the #development=1 tag in my URL. For every change the HTML layout, I would miss a close tag. This needed to change.
HTML Proofer
My first improvement to testing my website was adding HTMLProofer. HTMLProofer “is a set of tests to validate your HTML output. These tests check if your image references are legitimate, if they have alt tags, if your internal links are working, and so on. It’s intended to be an all-in-one checker for your output.”
Cool, right? After I set up the RubyGem, I found some broken HTML tags, a few 404 outgoing links, and missing alt tags on images. A few problems solved.
amphtml-validator
After I implemented AMP (more on that later), I needed a better way to test rather than opening up my browser and validating each page through the Chrome dev tools. amphtml-validator to the rescue; a Node.js package command line tool that validates AMP HTML files.
With a little Ruby-Fu, I was able to add the Node.js package execution to my Rakefile. It finds all of the *.html files in my AMP directory and passes them one at a time to the amphtml-validator. I check the exit status of the Node.js package, let the user know if it fails, and continue with my day.
Rakefile
desc 'Test website AMP validation'
task :amp do
  puts 'Running AMP Validator...'.yellow.bold
  amp_dir = '_site/amp'
  system("find #{amp_dir} -iname *.html | xargs -L1 amphtml-validator")
  if $CHILD_STATUS.exitstatus.zero?
    puts 'AMP Validator finished successfully.'.green
  else
    puts 'AMP Validator FAILED.'.red.bold
    exit($CHILD_STATUS.exitstatus)
  end
end
RuboCop
When I was working on a pull request for another project, the project’s Rake tests introduced me to RuboCop. RuboCop is a static code analyzer for Ruby that enforces guidelines from the Ruby Style Guide. It was a neat little tool that I added to my Rakefile to ensure Ruby code that I wrote would be understood by others. It wasn’t a huge change, but it was there to keep myself in check with the community style guidelines (something that I had very little experience with).
I added this to my project by installing the RuboCop RubyGem and adding its config file. The config file excludes a directory that would currently break a Travis-CI build.
.rubocop.yml
AllCops:
  Exclude:
    - vendor/**/* # Ignore Travis-CI build directory
Travis-CI
Adding tests were great. But I also liked the idea that if I was away from my build environment I could make a small change on my phone, test it, and deploy to production. This was a bit of a pipe dream for me. I knew as soon as I added tests, I wouldn’t be able to rely completely on GitHub builds. Likewise, if I wanted to add special plugins or RubyGems, say goodbye to GitHub builds.
But Travis-CI saves the day! Travis-CI will watch for code changes in my repo, fetch it, test it, and if it passes it could push my _site/ folder to my GH-Pages branch (where GitHub will deploy online). Pretty cool, huh?
I stumbled across this idea from Savas Labs who wrote a blog post last fall on how they deploy to GitHub Pages using Travis-CI. They were not the first, but I liked some of the ideas that they used. They would bring in pull requests to the source branch, test it, and deploy to a master branch for GH-Pages based on test results. I have followed suit. I made some changes to the scripts, like how I cache different directories and rely on the built in Node.JS versions, but the idea is still the same.
I’m actually a little proud of this, but my build time is now around 1½ minutes, and deploying only takes another 15 seconds. This was accomplished by:
- Caching Bundler
- Caching Node_Modules
- Resolving RVM and Node_Modules
whichconflict. This shaved nearly a minute off the build!
Read more on Travis-CI caching docs.
AMP Pages
Starting back in the middle of 2016, I wanted to implement AMP (accelerated mobile pages) in my website. In case you didn’t know, it’s a streamlined version of the webpage strongly optimized for mobile rendering and reduced load times. It also comes with its own special restrictions.
If there was something that would make the web experience faster for any readers, I was interested. My biggest problems were that Jekyll had yet to implement multiple layouts natively. This meant that I needed to rely on an external plugin in order to generate the AMP pages. Good thing I setup up Travis-CI!
I turned to amp-jekyll (which is now a RubyGem!) to add an AMP layout. There were a few small changes that I needed to make though. I had to figure out how to properly add videos to my posts, remove the AMP pages from my sitemap, and change the canonical URL on my AMP pages while using Jekyll-SEO-Tag.
AMP Sitemap Conflict
In order to avoid duplicate results, AMP pages are not necessary in the sitemap unless they are standalone pages. Referencing them in the <head> of the normal page is enough. Because jekyll-sitemap knew nothing about my AMP ambitions, I had to manually set a default in my amp.html layout frontmatter to stop them from being included.
_layouts/amp.html
---
layout: amp
sitemap: false
---
Easy enough.
AMP SEO Fixes
Next, my AMP pages had conflicts with Jekyll-SEO-Tag. Every AMP page would list its canonical URL as itself, when in reality it should be linking to the normal version of the webpage.
This was solved by cheating. I call it cheating because it’s not a robust solution. If I happen to include the site.ampdir anywhere in my SEO tags on an AMP page, that text will be removed.
The new method of changing the canonical url on AMP pages is accomplished by removing the first instance of site.ampdir in my page.url on pages whose layout is of type amp. I then rebuild the canonical url in the same format as Jekyll SEO Tag and update the JSON-LD with a small replace filter.
If my AMP Page canonical URL contained /amp like so:
href="https://www.kyleniewiada.org/amp/blog/2017/02/improving-jekyll-2017/"
It would now be altered to:
href="https://www.kyleniewiada.org/blog/2017/02/improving-jekyll-2017/"
Whenever I grab the SEO tag, I make sure to run in through my “parser” first to fix it. Here’s how I do it.
_includes/amp-check.html
{% capture seo_text %}{% seo %}{% endcapture %}

{% if include.src == "SEO" %}
  <!-- Assumes AmpDir is always first instance in page.url based on how amp-jekyll builds it -->
  {% assign canonical_amp = page.url | absolute_url %}
  {% assign canonical_amp_removed = page.url | remove_first: site.ampdir | absolute_url %}
  {{ seo_text | replace: canonical_amp, canonical_amp_removed }}
{% endif %}
Now all I need to do is call the Jekyll-SEO-Tag with {% include amp-check.html src="SEO" %} in the <head> of my layout. Problem solved.
AMP Videos
AMP Videos require a bit of finesse to implement. They need to have a special JS file loaded in the head and they need to follow the correct amp-video guidelines.
Fixing the <Head>
To get that special JS file, I decided the easiest way would be to add a frontmatter variable in each post stating which special AMP JS files were needed. Then I would make a check for it in the <head>. For example, a blog post with an embedded video would have:
amp:
  - video
Then the AMP <head> layout would include:
_includes/amp/head.html
{% if page.amp contains 'video' %}
  <script async custom-element="amp-video" src="https://cdn.ampproject.org/v0/amp-video-0.1.js"></script>
{% endif %}
Fixing the Post
Now that the <head> had the correct dependencies, I had to figure out how to embed the video file in my blog post in the appropriate way for each page layout.
This was accomplished with a small include that would take in the parameters from a post specifying the video type and other special properties.
I would add a video to my post with:
{% include video.html
  src="/assets/files/2016/03/bug_example.mp4"
  poster="/assets/files/2016/03/bug_example_poster.png"
  controls="loop"
%}
Then the video include would properly insert the video for both AMP and default layouts.
_includes/video.html
<!-- Method to implement AMP-Video. -->
{% assign height = include.height | default: "420" %}
{% assign width = include.width | default: "700" %}
{% assign type = include.type | default: "normal" %}

{% if type contains 'normal' %}
  {% if page.layout == 'amp' %}
    <amp-video height="{{ height }}" width="{{ width }}" poster="{{ include.poster }}" layout="responsive" controls {{ include.controls }}>
      <div fallback>
        Your browser doesn’t support HTML5 video
      </div>
      <source type="video/mp4" src="{{ include.src }}"/>
    </amp-video>
  {% else %}
    <video width="{{ width }}" controls {{ include.controls }}>
      <source src="{{ include.src }}" type="video/mp4" />
      <p>Your browser doesn’t support HTML5 video</p>
    </video>
  {% endif %}
{% endif %}
In the code above, it first checks to see if the video type from the post is a “normal” embedded video, or a YouTube video (not shown). Next, it checks to see if the webpage layout is of type amp. If this is also true, then it will insert the correct HTML layout for an AMP video. Otherwise, it will insert the video with normal HTML5.
You can find more information or any updates to my implementation on the repo Wiki.
Results
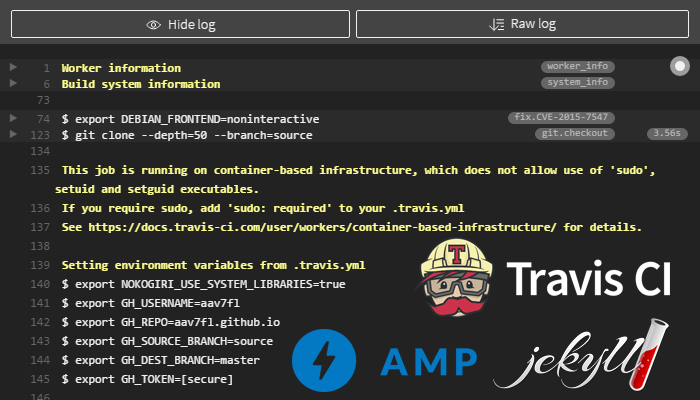
Now when I run the amphtml-validator tests, all of my AMP pages pass.
Running AMP Validator...
_site/amp/blog/2013/04/somewhere-to-start/index.html: PASS
_site/amp/blog/2013/09/restoring-vintage-with-3d-printing/index.html: PASS
...
_site/amp/blog/2016/07/fixing-no-google-profile-for-contact/index.html: PASS
_site/amp/blog/2017/01/backing-up-android-nougat-cats/index.html: PASS
AMP Validator finished successfully.
An explanation on my testing method is found earlier in this post.
Other Improvements
Outside of testing/building, there were a few other improvements that I made to my website. I fixed conflicts with AMP pages and other plugins, added a wiki to the website repo, and put forth a small graphical upgrade with favicon branding and banners.
Plugins
Earlier in this post I talked about how I was using Travis-CI to build and deploy my website. Building outside of GitHub offered me the freedom to use my own plugins or RubyGems rather than limiting myself to the GitHub-Pages Allowed Dependencies. One of them I’ve already mentioned; amp-jekyll. This was used to implement an AMP layout to my blog postings.
The only custom RubyGem that I am using is Jekyll-SEO-Tag. Well… a fork of Jekyll-SEO-Tag. That is, until they hopefully accept my pull request. My pull request corrects and updates the JSON-LD for a blog post to meet Google’s current recommendations. But for now, I have a special entry in my Gemfile pointing to my fork.
Gemfile
group :jekyll_plugins do
  git 'https://github.com/aav7fl/jekyll-seo-tag.git' do
    gem 'jekyll-seo-tag', branch: 'testing'
  end
end
Website Wiki
I added a wiki to my website repo
so others could build out their own project from my website if they wanted to. Additionally, the README.md for my repo was becoming far too large to include all of the information about how to build, customize, and deploy my website. This meant that I could make separate changes to the documentation without adding another code commit.
Less Code is More
Lastly, I made a substantial improvements to the CSS, lightened the webpage layout, and squashed remaining bugs that I could find (looking at you MS Edge…). Below is a fairly comprehensive list of the major changes I made. They don’t deserve their own individual section, but they are still worth mentioning
- Removed CSS normalize/Strongly simplified
- Removed complicated JavaScript header navigation (CSS3 only now)
- Switched post-navigation and footer to use Flexbox that collapses responsively
- Switched to HTML5 tags (
<main>,<article>,<footer>) - Fixed SVG banner image bugs that existed in Edge/IE and iOS Safari
- Edge/IE would not dislpay the SVG banner if it met the following conditions:
- Set as a CSS background-image
- Displayed with
background-size: cover; - Stretched too wide (it would disappear immediately).
This was resolved by adding
x="0" y="0"to the<filter>tag in my SVG file. What a bug…
- iOS Safari would display the banner with a smokey-white haze when using the Gaussian Blur filter as it somehow conflicted with the background layer. This was resolved by removing the background fill from the SVG and instead handling it with the
<DIV>background:.
- Edge/IE would not dislpay the SVG banner if it met the following conditions:
- Added favicon sets (like Apple-Touch-Icon) using RealFaviconGenerator with updated colors
I’ve had a reader mention WebsitePlanet an alternative to RealFaviconGenerator. WebsitePlanet generates a bunch of different sizes at the same time; so keep that in mind if one website does it better than the other.
Conclusion
As much as I tried to stay entirely within the GitHub Pages ecosystem, it didn’t fit my needs. But that was a good thing. This gave me the chance to check out other build environments and different tools that wouldn’t have been in my reach before. This gave me the opportunity to look at other open source projects, to learn about their process, and contribute my own work back.
If you have any questions or concerns about how or why I did something, or I wasn’t clear on an explanation, feel free to comment about it below and I’ll try to get back to you.